Upgrading to Airflow 3
Apache Airflow 3 is a major release and contains breaking changes. This guide walks you through the steps required to upgrade from Airflow 2.x to Airflow 3.0.
Understanding Airflow 3.x Architecture Changes
Airflow 3.x introduces significant architectural changes that improve security, scalability, and maintainability. Understanding these changes helps you prepare for the upgrade and adapt your workflows accordingly.
Airflow 2.x Architecture
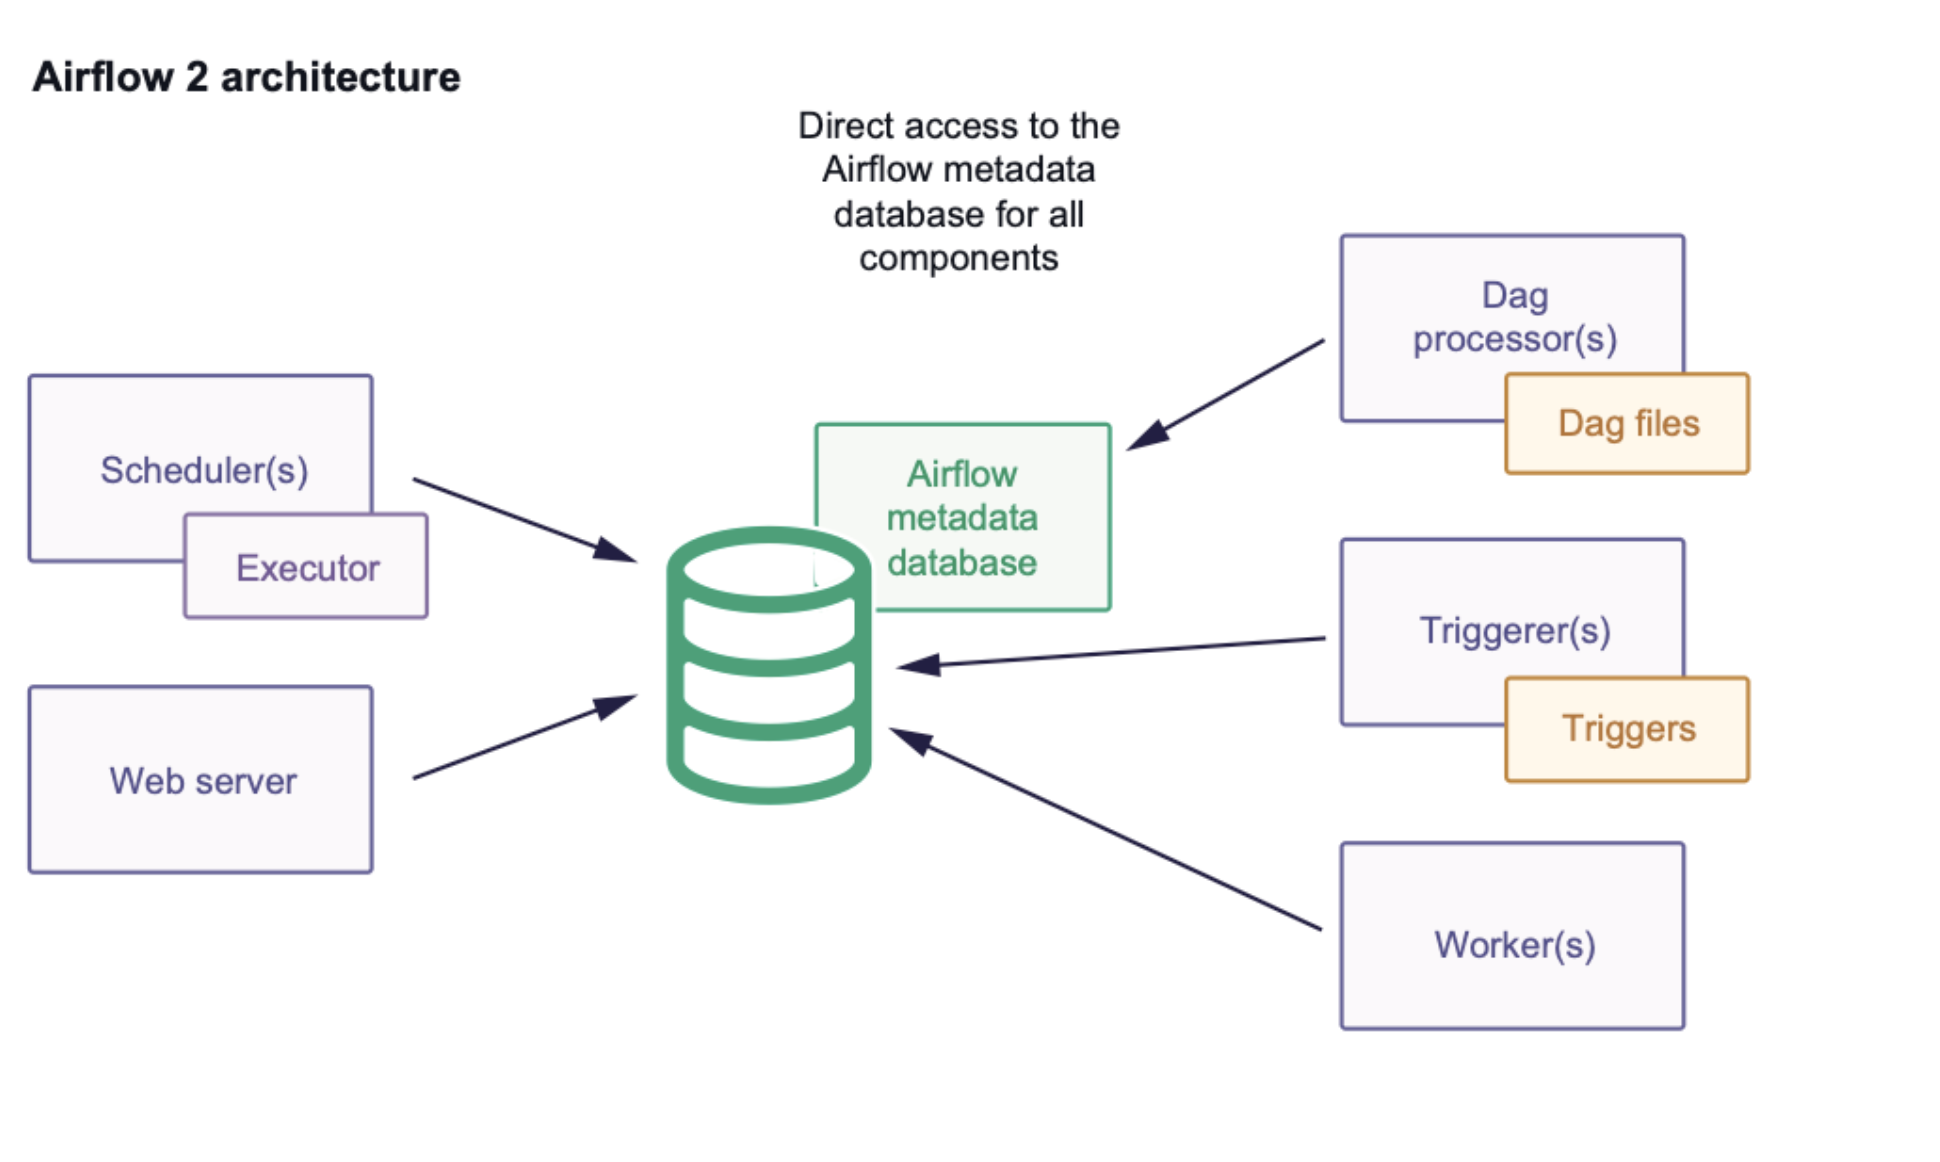
All components communicate directly with the Airflow metadata database.
Airflow 2 was designed to run all components within the same network space: task code and task execution code (airflow package code that runs user code) run in the same process.
Workers communicate directly with the Airflow database and execute all user code.
User code could import sessions and perform malicious actions on the Airflow metadata database.
The number of connections to the database was excessive, leading to scaling challenges.
Airflow 3.x Architecture
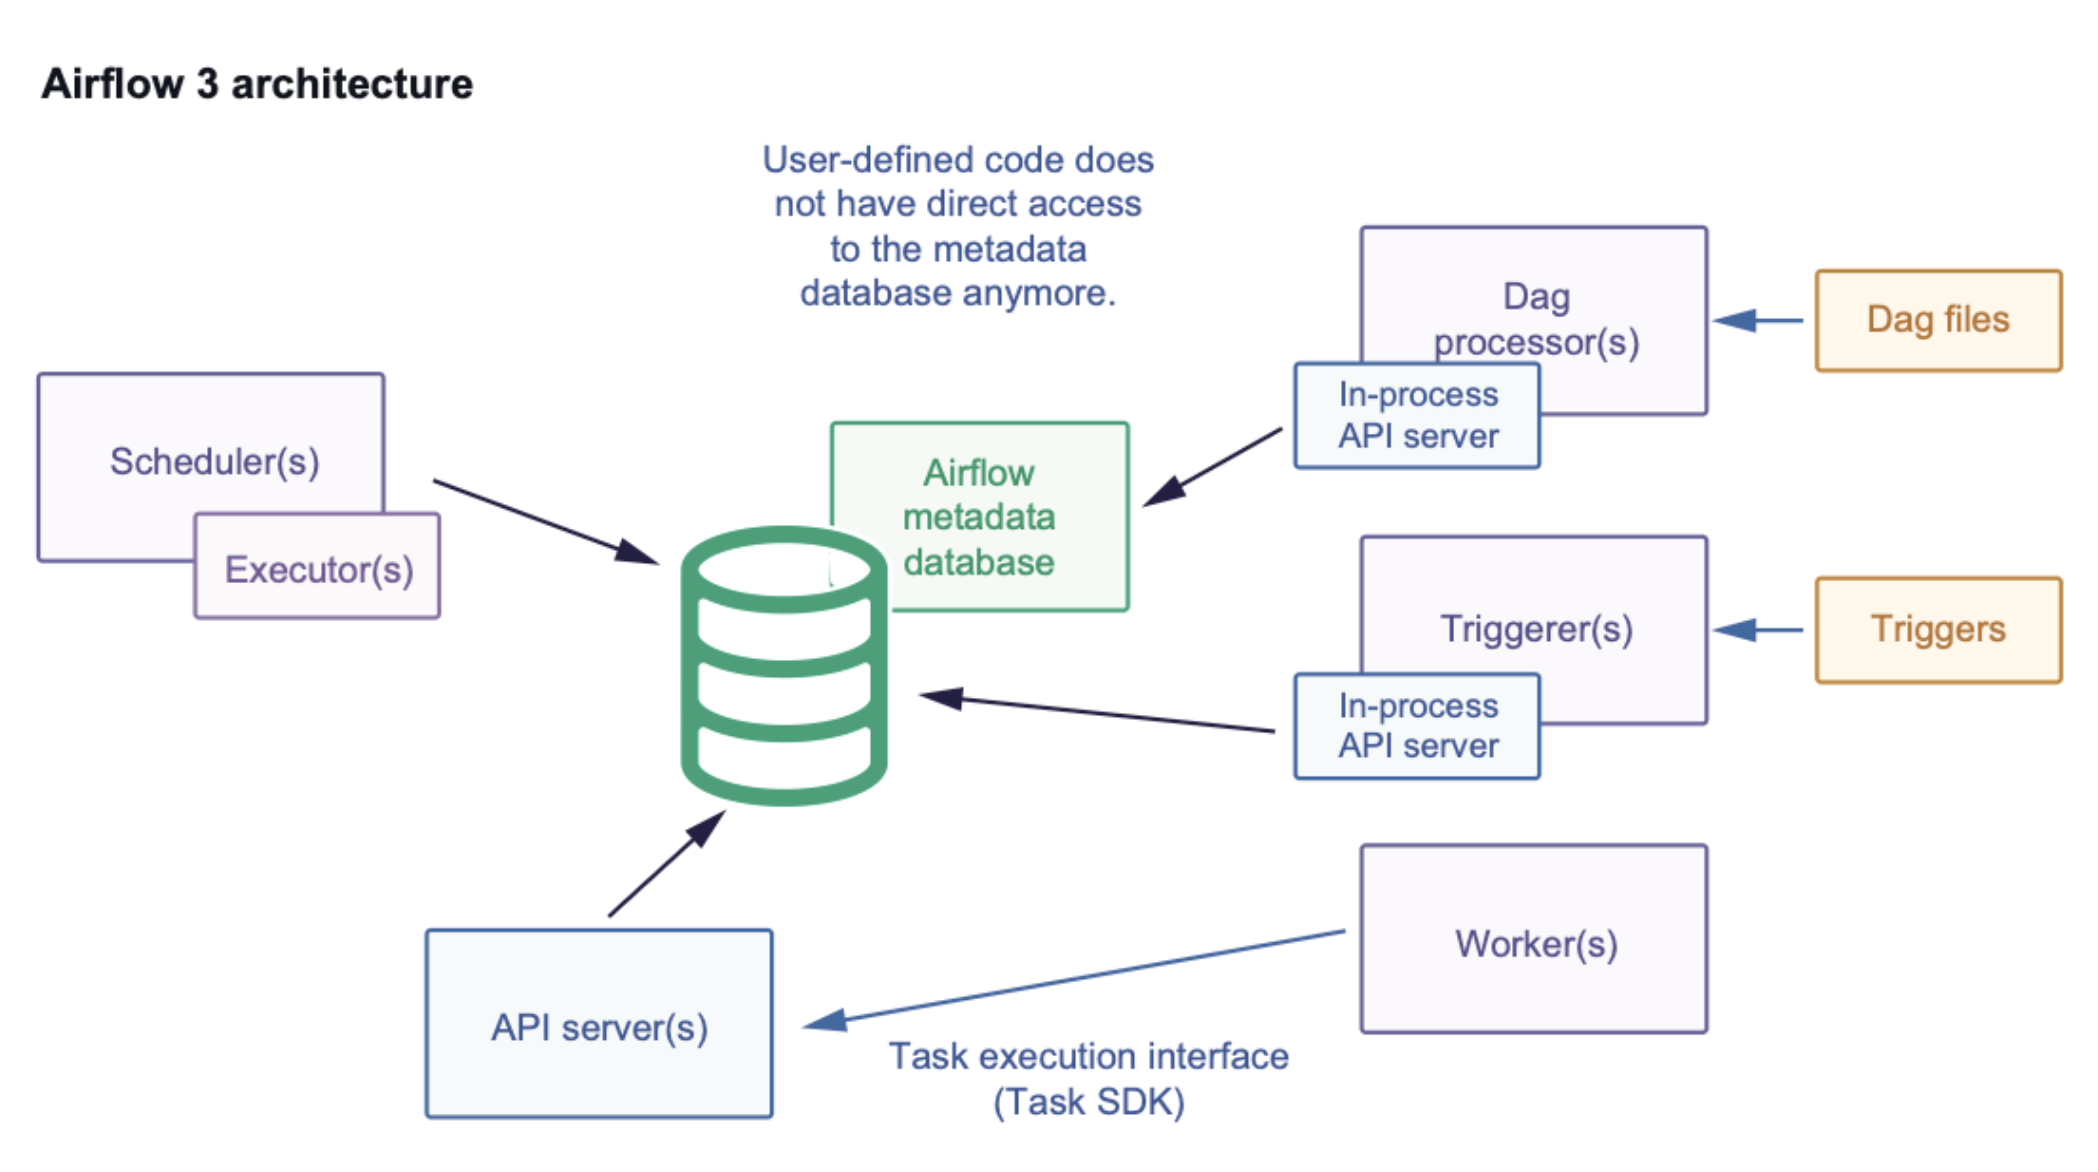
The API server is currently the sole access point for the metadata DB for tasks and workers.
It supports several applications: the Airflow REST API, an internal API for the Airflow UI that hosts static JS, and an API for workers to interact with when executing TIs via the task execution interface.
Workers communicate with the API server instead of directly with the database.
Dag processor and Triggerer utilize the task execution mechanism for their tasks, especially when they require variables or connections.
Database Access Restrictions
In Airflow 3, direct metadata database access from task code is now restricted. This is a key security and architectural improvement that affects how Dag authors interact with Airflow resources:
No Direct Database Access: Task code can no longer directly import and use Airflow database sessions or models.
API-Based Resource Access: All runtime interactions (state transitions, heartbeats, XComs, and resource fetching) are handled through a dedicated Task Execution API.
Enhanced Security: This improves isolation and security by preventing worker task code from directly accessing or modifying the Airflow metadata database. Note that Dag author code potentially still executes with direct database access in the Dag File Processor and Triggerer — see Airflow Security Model for details.
Stable Interface: The Task SDK provides a stable, forward-compatible interface for accessing Airflow resources without direct database dependencies.
Step 1: Take care of prerequisites
Make sure that you are on Airflow 2.7 or later. It is recommended to upgrade to latest 2.x and then to Airflow 3.
Make sure that your Python version is in the supported list.
Ensure that you are not using any features or functionality that have been removed in Airflow 3.
Step 2: Clean and back up your existing Airflow Instance
It is highly recommended that you make a backup of your Airflow instance, specifically your Airflow metadata database before starting the migration process.
If you do not have a “hot backup” capability for your database, you should do it after shutting down your Airflow instances, so that the backup of your database will be consistent. For example, if you don’t turn off your Airflow instance, the backup of the database will not include all TaskInstances or DagRuns.
If you did not make a backup and your migration fails, you might end up in a half-migrated state. This can be caused by, for example, a broken network connection between your Airflow CLI and the database during the migration. Having a backup is an important precaution to avoid problems like this.
A long running Airflow instance can accumulate a substantial amount of data that are no longer required (for example, old XCom data). Schema changes will be a part of the Airflow 3 upgrade process. These schema changes can take a long time if the database is large. For a faster, safer migration, we recommend that you clean up your Airflow meta-database before the upgrade. You can use the
airflow db cleanAirflow CLI command to trim your Airflow database.Ensure that there are no errors related to Dag processing, such as
AirflowDagDuplicatedIdException. You should be able to runairflow dags reserializewith no errors. If you have to resolve errors from Dag processing, ensure you deploy your changes to your old instance prior to upgrade, and wait until your Dags have all been reprocessed (and all errors gone) before you proceed with upgrade.
Step 4: Install the Standard Provider
Some of the commonly used Operators, Sensors, and Triggers which were bundled as part of the
airflow-corepackage (for exampleBashOperator,PythonOperator,ExternalTaskSensor,FileSensor, etc.) have now been split out into a separate package:apache-airflow-providers-standard.For convenience, this package can also be installed on Airflow 2.x versions, so that Dags can be modified to reference these Operators from the standard provider package instead of Airflow Core.
Step 5: Review custom written tasks for direct DB access
In Airflow 3, operators cannot access the Airflow metadata database directly using database sessions. If you have custom operators, review your code to ensure there are no direct database access calls. You can follow examples in https://github.com/apache/airflow/issues/49187 to learn how to modify your code if needed.
If you have custom operators or task code that previously accessed the metadata database directly, you must migrate to one of the following approaches:
Recommended Approach: Use Airflow Python Client
Use the official Airflow Python Client to interact with Airflow metadata database via REST API. The Python Client has APIs defined for most use cases, including DagRuns, TaskInstances, Variables, Connections, XComs, and more.
Pros: - No direct database network access required from workers - Most aligned with Airflow 3’s API-first architecture - No database credentials needed in worker environment (uses API tokens) - Workers don’t need database drivers installed - Centralized access control and authentication via API server
Cons:
- Requires installing apache-airflow-client package
- Requires acquisition of access tokens by performing API call to /auth/token and rotating them as needed
- Requires API server availability and network access to API server
- Not all database operations may be exposed via API endpoints
Note
If you need functionality that is not available via the Airflow Python Client, consider requesting new API endpoints or Task SDK features. The Airflow community prioritizes adding missing API capabilities over enabling direct database access.
Known Workaround: Use DbApiHook (PostgresHook or MySqlHook)
Warning
This approach is NOT recommended and is documented only as a known workaround for users who cannot use the Airflow Python Client. This approach has significant limitations and will break in future Airflow versions.
Important considerations:
Will break in future versions: This approach will break in Airflow 3.2+ and beyond. You are responsible for adapting your code when schema changes occur.
Database schema is NOT a public API: The Airflow metadata database schema can change at any time without notice. Schema changes will break your queries without warning.
Breaks task isolation: This contradicts one of Airflow 3’s core features - task isolation. Tasks should not directly access the metadata database.
Performance implications: This reintroduces Airflow 2 behavior where each task opens separate database connections, dramatically changing performance characteristics and scalability.
If your use case cannot be addressed using the Python Client and you understand the risks above, you may use database hooks to query your metadata database directly. Create a database connection (PostgreSQL or MySQL, matching your metadata database type) pointing to your metadata database and use Database Hooks in Airflow.
Note: These hooks connect directly to the database (not via the API server) using database drivers like psycopg2 or mysqlclient.
Example using PostgresHook (MySql has similar interface too)
from airflow.sdk import task
from airflow.providers.postgres.hooks.postgres import PostgresHook


@task
def get_connections_from_db():
    hook = PostgresHook(postgres_conn_id="metadata_postgres")
    records = hook.get_records(sql="""
        SELECT conn_id, conn_type, host, schema, login
        FROM connection
        WHERE conn_type = 'postgres'
        LIMIT 10;
        """)

    return records
Example using SQLExecuteQueryOperator
You can also use SQLExecuteQueryOperator if you prefer to use operators instead of hooks:
from airflow.providers.common.sql.operators.sql import SQLExecuteQueryOperator

query_task = SQLExecuteQueryOperator(
    task_id="query_metadata",
    conn_id="metadata_postgres",
    sql="SELECT conn_id, conn_type FROM connection WHERE conn_type = 'postgres'",
    do_xcom_push=True,
)
Note
Always use read-only database credentials for metadata database connections and it is recommended to use temporary credentials.
Step 6: Deployment Managers - Upgrade your Airflow Instance
For an easier and safer upgrade process, we have also created a utility to upgrade your Airflow instance configuration.
The first step is to run this configuration check utility as shown below:
airflow config update
This configuration utility can also update your configuration to automatically be compatible with Airflow 3. This can be done as shown below:
airflow config update --fix
The biggest part of an Airflow upgrade is the database upgrade. The database upgrade process for Airflow 3 is the same as for Airflow 2.7 or later:
airflow db migrate
If you have plugins that use Flask-AppBuilder views ( appbuilder_views ), Flask-AppBuilder menu items ( appbuilder_menu_items ), or Flask blueprints ( flask_blueprints ), you will either need to convert
them to FastAPI apps or ensure you install the FAB provider which provides a backwards compatibility layer for Airflow 3.
Ideally, you should convert your plugins to the Airflow 3 Plugin interface i.e External Views (external_views), Fast API apps (fastapi_apps)
and FastAPI middlewares (fastapi_root_middlewares).
If you use the Airflow Helm Chart to deploy Airflow, please check your defined values against configuration options available in Airflow 3.
All configuration options below webserver need to be changed to apiServer. Consider that many parameters have been renamed or removed.
For the full chart-specific upgrade checklist (values.yaml changes, the standalone Dag processor, JWT secret, FAB defaults, minimum Kubernetes version, and renamed keys across chart 1.16.0..``1.18.0``), see Upgrading the Helm Chart to Airflow 3.
Step 7: Changes to your startup scripts
In Airflow 3, the Webserver has become a generic API server. The API server can be started up using the following command:
airflow api-server
The Dag processor must now be started independently, even for local or development setups:
airflow dag-processor
You should now be able to start up your Airflow 3 instance.
Step 8: Things to check
Please consider checking the following things after upgrading your Airflow instance:
If you configured Single-Sign-On (SSO) using OAuth, OIDC, or LDAP, make sure that the authentication is working as expected. If you use a custom
webserver_config.pyyou need to replacefrom airflow.www.security import AirflowSecurityManagerwithfrom airflow.providers.fab.auth_manager.security_manager.override import FabAirflowSecurityManagerOverride.
Breaking Changes
Some capabilities which were deprecated in Airflow 2.x are not available in Airflow 3. These include:
SubDAGs: Replaced by TaskGroups, Assets, and Data Aware Scheduling.
Sequential Executor: Replaced by LocalExecutor, which can be used with SQLite for local development use cases.
CeleryKubernetesExecutor and LocalKubernetesExecutor: Replaced by Multiple Executor Configuration
SLAs: Deprecated and removed; replaced with Deadline Alerts.
Subdir: Used as an argument on many CLI commands,
--subdiror-Shas been superseded by Dag bundles.REST API (
/api/v1) replaced: Use the modern FastAPI-based stable/api/v2instead; see Airflow API v2 for details.Some Airflow context variables: The following keys are no longer available in a task instance’s context. If not replaced, will cause Dag errors: -
tomorrow_ds-tomorrow_ds_nodash-yesterday_ds-yesterday_ds_nodash-prev_ds-prev_ds_nodash-prev_execution_date-prev_execution_date_success-next_execution_date-next_ds_nodash-next_ds-execution_dateThe
catchup_by_defaultDag parameter is nowFalseby default.The
create_cron_data_intervalsconfiguration is nowFalseby default. This means that theCronTriggerTimetablewill be used by default instead of theCronDataIntervalTimetable.This only affects Dags that pass a bare cron string to
schedule=(e.g.schedule="0 0 * * *"); Dags that pass an explicit timetable instance are unaffected. Decide whether you rely ondata_interval_start/data_interval_end(and on the related templated values likeds/tsin your tasks, which are derived fromlogical_dateand shift between the two timetables). If you do, setcreate_cron_data_intervals=Trueexplicitly to keepCronDataIntervalTimetable. If you don’t, the newFalsedefault is fine.Set this before the upgrade. If you instead change the flag after some Airflow 3 dagruns already exist (going
CronTriggerTimetable->CronDataIntervalTimetable), one scheduled run is skipped to avoid colliding with the previous run’slogical_date.Manual Dag runs and data intervals: In Airflow 3, do not assume that a manually triggered Dag run’s
data_intervalis derived from, or equal to, the suppliedlogical_date. If your Dag logic needs the user-specified trigger date, uselogical_dateexplicitly. This especially affects workflows that readdata_interval_startordata_interval_endduring manual triggering or when usingTriggerDagRunOperator. For detailed migration guidance, see Manual Dag Runs and logical_date.Simple Auth is now default
auth_manager. To continue using FAB as the Auth Manager, please install the FAB provider and setauth_managertoFabAuthManager:airflow.providers.fab.auth_manager.fab_auth_manager.FabAuthManagerAUTH API api routes defined in the auth manager are prefixed with the
/authroute. Urls consumed outside of the application such as oauth redirect urls will have to updated accordingly. For example an oauth redirect url that washttps://<your-airflow-url.com>/oauth-authorized/googlein Airflow 2.x will behttps://<your-airflow-url.com>/auth/oauth-authorized/googlein Airflow 3.xXCom Pull Default Behavior: Calling
xcom_pull()without atask_idsargument now pulls only from the current task. In Airflow 2, omittingtask_idswould search all tasks in the Dag run and return the most recently pushed value for the given key. You must now explicitly passtask_idsto pull XComs from other tasks:# Airflow 2 - pulls most recent value from any task value = ti.xcom_pull(key="shared_state") # Airflow 3 - same call only checks the current task value = ti.xcom_pull(key="shared_state") # Airflow 3 - specify task_ids to pull from other tasks value = ti.xcom_pull(task_ids="upstream_task", key="shared_state")
Manual Dag Runs and logical_date
For scheduled runs, logical_date and data_interval are both derived from
the Dag’s timetable.
For manually triggered runs in Airflow 3, do not assume that
data_interval_start or data_interval_end are derived from, or equal to,
the supplied logical_date. The resulting data_interval depends on the
timetable and the trigger path, and some APIs also allow the data interval to
be provided explicitly.
This matters most for Dags that:
use
data_interval_startordata_interval_endduring manual runstrigger downstream Dags with
TriggerDagRunOperatormigrated from Airflow 2 and treated
data_interval_startas the requested manual run date
Migration guidance
If your Dag logic needs the user-specified date for a manual run, use
logical_date explicitly.
from airflow.decorators import get_current_context, task


@task
def process_data():
    context = get_current_context()
    processing_date = context["logical_date"]
    return f"Processing data for {processing_date}"
Keep using data_interval_start and data_interval_end when you need the
run’s resolved interval semantics instead of the user-supplied trigger date.
When upgrading from Airflow 2, review any manual-triggered workflows that read
data_interval_start or data_interval_end and confirm whether they
really wanted the interval semantics or the requested logical date.