Warning
The Lambda Executor is alpha/experimental at the moment and may unstable and be subject to change without warning.
AWS Lambda Executor
This is an Airflow executor powered by AWS Lambda. Each task that Airflow schedules for execution is run as an asynchronous Lambda function invocation. Some benefits of an executor like this include:
Task isolation: No task can be a noisy neighbor for another. Resources are isolated to each individual task. Any failures affect only the single task running in that Lambda function. No single user can overload the environment by triggering too many tasks.
Lightweight execution: Lambda functions start quickly and have minimal overhead, making this executor ideal for short-running tasks that don’t require substantial CPU or memory.
Cost effective: Compute resources only exist for the lifetime of the Airflow task itself. Lambda’s pay-per-use pricing model ensures you only pay for actual task execution time.
Highly scalable: Lambda can scale to handle thousands of concurrent executions with no pre-provisioning.
For a quick start guide please see here, it will get you up and running with a basic configuration. Both an example Dockerfile (found here) and Lambda invocation handler (found here) are provided. The below sections provide more generic details about configuration, the provided example Dockerfile and logging.
How Does it Work?
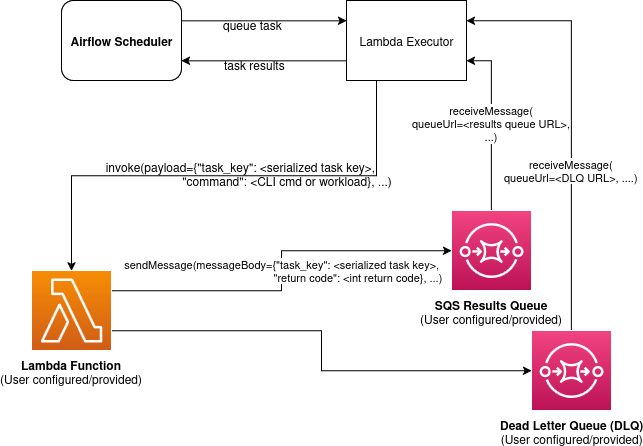
The executor leverages AWS Lambda for compute and SQS as a communication channel. When a task is queued to run with the Lambda executor a Lambda function is asynchronously invoked with a payload containing the task key being run and the Airflow CLI command/workload to run. The Lambda function executes the task and then must publish a message to the SQS results queue with the same task key it received as well as the return code of the Airflow task execution process. The Lambda executor periodically polls this SQS results queue for messages and updates its internal state with the results it receives. The Lambda function must also be configured with a Dead Letter Queue (DLQ) to which Lambda will automatically send messages to for invocations that fail to be processed, for example due to the 15 minute max timeout of Lambda functions. The Lambda executor will also poll this DLQ for messages and update the internal state with the results it receives.
Quotas
When working with the Lambda Executor it is important to be familiar with the AWS Lambda quotas as they may affect performance and scalability. For more information, please refer to the official AWS Lambda documentation on quotas.
Config Options
There are a number of configuration options available, which can either
be set directly in the airflow.cfg file under an “aws_lambda_executor”
section or via environment variables using the
AIRFLOW__AWS_LAMBDA_EXECUTOR__<OPTION_NAME> format, for example
AIRFLOW__AWS_LAMBDA_EXECUTOR__FUNCTION_NAME = "myLambdaFunction". For
more information on how to set these options, see Setting Configuration
Options
Note
Configuration options must be consistent across all the hosts/environments running the Airflow components (Scheduler, Webserver, Lambda function, etc). See here for more details on setting configurations.
In the case of conflicts, the order of precedence from lowest to highest is:
Load default values for options which have defaults.
Load any values explicitly provided through airflow.cfg or environment variables. These are checked with Airflow’s config precedence.
Note
executor_config is an optional parameter that can be provided to operators. It is a dictionary type and in the context of the Lambda Executor it is passed to each Lambda invocation as part of the payload. This allows you to pass additional context to the Lambda function for any particular task execution. The Lambda function can then access this configuration via the executor_config key in the payload within the Lambda handler code.
Required config options:
FUNCTION_NAME - Name or ARN of the AWS Lambda function to invoke. Required.
QUEUE_URL - URL of the SQS queue that will receive task execution results. Required.
DEAD_LETTER_QUEUE_URL - URL of the Dead Letter Queue for processing Lambda execution failures. Required
Optional config options:
FUNCTION_QUALIFIER - Version or alias of the Lambda function to invoke. Defaults to
$LATEST.CONN_ID - The Airflow connection (i.e. credentials) used by the Lambda executor to make API calls to AWS Lambda and SQS. Defaults to
aws_default.REGION_NAME - The name of the AWS Region where AWS Lambda and SQS are configured.
CHECK_HEALTH_ON_STARTUP - Whether to check the Lambda Executor health on startup by testing connectivity to required AWS services. Defaults to
True.MAX_INVOKE_ATTEMPTS - The maximum number of times the Lambda Executor should attempt to invoke a function. This refers to instances where the invocation fails (i.e. AWS API failures, throttling, etc). Defaults to
3.
For a more detailed description of available options, including type
hints and examples, see the config_templates folder in the Amazon
provider package.
Dockerfile for AWS Lambda Executor
An example Dockerfile can be found here, it creates an image that can be used by AWS Lambda to run Airflow tasks using the AWS Lambda Executor in Apache Airflow. The image supports AWS CLI/API integration, allowing you to interact with AWS services within your Airflow environment. It also includes options to load Dags from either an S3 bucket or a local folder.
Prerequisites
Docker must be installed on your system. Instructions for installing Docker can be found here.
Building an Image
The AWS CLI will be installed within the image, and there are multiple ways to pass AWS authentication information to the container and thus multiple ways to build the image. This guide will cover 2 methods.
The most secure method is to use IAM roles. When creating a Lambda Function
Definition, you are able to select an execution role. This role needs
permissions to publish messages to the SQS queues and to write to CloudWatchLogs
or S3 if using AWS remote logging and/or using S3 to synchronize Dags
(e.g. CloudWatchLogsFullAccess or CloudWatchLogsFullAccessV2).
The AWS credentials used on the Scheduler need permissions to
describe and invoke Lambda functions as well as to describe and read/delete
SQS messages.
To create a new role for use by Lambda follow the below:
Navigate to the IAM page on the AWS console, and from the left hand tab, under Access Management, select Roles.
On the Roles page, click Create role on the top right hand corner.
Under Trusted entity type, select AWS Service.
Select Lambda from the drop down under Use case. Click Next.
In the Permissions page, select the permissions the role will need, depending on the actions it will perform (at least including the permissions described above). Click Next after selecting all the required permissions.
Enter a name for the new role, and an optional description. Review the Trusted Entities, and the permissions for the role. Add any tags as necessary, and click Create role.
When creating the Lambda Function (see the setup guide for more details), select the newly created role.
Then you can build your image by cd-ing to the directory with the Dockerfile and running:
docker build -t my-airflow-image \
 --build-arg aws_default_region=YOUR_DEFAULT_REGION .
Note: It is important that images are built and run under the same architecture. For example,
for users on Apple Silicon, you may want to specify the arch using docker buildx:
docker buildx build --platform=linux/amd64 -t my-airflow-image \
  --build-arg aws_default_region=YOUR_DEFAULT_REGION .
See
here for more information
about using docker buildx.
The second method is to use the build-time arguments
(aws_access_key_id, aws_secret_access_key,
aws_default_region, and aws_session_token).
Warning
This method is not recommended for use in production environments, because user credentials are stored in the container, which may be a security vulnerability.
To pass AWS authentication information using these arguments, use the
--build-arg option during the Docker build process. For example:
docker build -t my-airflow-image \
 --build-arg aws_access_key_id=YOUR_ACCESS_KEY \
 --build-arg aws_secret_access_key=YOUR_SECRET_KEY \
 --build-arg aws_default_region=YOUR_DEFAULT_REGION \
 --build-arg aws_session_token=YOUR_SESSION_TOKEN .
Replace YOUR_ACCESS_KEY, YOUR_SECRET_KEY,
YOUR_SESSION_TOKEN, and YOUR_DEFAULT_REGION with valid AWS
credentials.
Base Image
The Docker image is built upon the public.ecr.aws/lambda/python image.
This base image contains the necessary components for the Lambda function to
run. Apache Airflow is installed into the image via pip. You can modify the
Dockerfile to install additional packages or different versions of Airflow as
needed for your use case.
- It is also possible to build the image based of
apache/airflow:latest and the Lambda runtime can be included separately (follow steps here).
Loading Dags
There are many ways to load Dags on a container used by Lambda. This Dockerfile is preconfigured with two possible ways: copying from a local folder, or downloading from an S3 bucket. Other methods of loading Dags are possible as well.
From S3 Bucket
Dags can be loaded from S3 when using the provided example app.py, which contains logic to synchronize the Dags from S3 to the local filesystem of the Lambda function (see the app.py code here).
To load Dags from an S3 bucket add --build-arg s3_uri=YOUR_S3_URI in
the docker build command. Replace YOUR_S3_URI with the URI of your S3
bucket/path containing your Dags. Make sure you have the appropriate
permissions to read from the bucket.
docker build -t my-airflow-image --build-arg s3_uri=YOUR_S3_URI .
From Local Folder
To load Dags from a local folder, place your Dag files in a folder
within the docker build context on your host machine, and provide the
location of the folder using the host_dag_path build argument. By
default, the Dags will be copied to /opt/airflow/dags, but this can
be changed by passing the container_dag_path build-time argument
during the Docker build process:
docker build -t my-airflow-image --build-arg host_dag_path=./dags_on_host --build-arg container_dag_path=/path/on/container .
If choosing to load Dags onto a different path than
/opt/airflow/dags, then the new path will need to be updated in the
Airflow config.
Installing Python Dependencies
This Dockerfile supports installing Python dependencies via pip from
a requirements.txt file. Place your requirements.txt file in the
same directory as the Dockerfile. If it is in a different location, it
can be specified using the requirements_path build-argument. Keep in
mind the Docker context when copying the requirements.txt file.
Uncomment the two appropriate lines in the Dockerfile that copy the
requirements.txt file to the container, and run pip install to
install the dependencies on the container.
Using the AWS Lambda Executor Docker Image
Detailed instructions on how to use the Docker image, that you have created via these steps can be found here.
Logging
Airflow tasks executed via this executor run within the configured VPC. This means that logs are not directly accessible to the Airflow UI, after task completion, the logs would be permanently lost.
Remote logging should be employed when using the Lambda executor to persist your Airflow Task logs and make them viewable from the Airflow UI.
Configuring Remote Logging
There are many ways to configure remote logging and several supported destinations. A general overview of Airflow Task logging can be found here. Instructions for configuring S3 remote logging can be found here and Cloudwatch remote logging here. Some important things to point out for remote logging in the context of the Lambda executor:
The configuration options for Airflow remote logging should be configured on all hosts and containers running Airflow. For example the Webserver requires this config so that it can fetch logs from the remote location and the Lambda container requires the config so that it can upload the logs to the remote location. See here to read more about how to set Airflow configuration via config file or environment variable exports.
Adding the Airflow remote logging config to Lambda can be done in many ways. Some examples include, but are not limited to:
Exported as environment variables directly in the Dockerfile (see the Dockerfile section above)
Updating the
airflow.cfgfile or copy/mounting/downloading a customairflow.cfgin the Dockerfile.Added in the Lambda Function definition in plain text or via Secrets/System Manager
Remember that you must have credentials configured within the container to be able to interact with the remote service for your logs (e.g. S3, CloudWatch Logs, etc). This can be done in many ways. Some examples include, but are not limited to:
Export credentials into the Dockerfile directly (see the Dockerfile section above)
Configure an Airflow Connection and provide this as the remote logging conn id (exported into the Lambda Function by any of the means listed above or your preferred method). Airflow will then use these credentials specifically for interacting with your chosen remote logging destination.
Note
Configuration options must be consistent across all the hosts/environments running the Airflow components (Scheduler, Webserver, Lambda invocations, etc). See here for more details on setting configurations.
Lambda Logging
Lambda will send logging information to CloudWatch Logs for the Function invocations themselves. These logs will include the Airflow Task Operator logging and any other logging that occurs throughout the life of the process running in the Lambda function. This can be helpful for debugging issues with remote logging or while testing remote logging configuration.
Note: These logs will NOT be viewable from the Airflow Webserver UI.
Setting up a Lambda Executor for Apache Airflow
There are 3 steps involved in getting a Lambda Executor to work in Apache Airflow:
Creating a database that Airflow and the tasks running in Lambda Functions can connect to (Note: In Airflow 3, tasks no longer directly access the DB).
Creating and configuring a Lambda Function (and its associated SQS queues) that can run tasks from Airflow.
Configuring Airflow to use the Lambda Executor
There are different options for selecting a database backend. See here for more information about the different options supported by Airflow. The following guide will explain how to set up a PostgreSQL RDS Instance on AWS.
Setting up an RDS DB Instance for AWS Lambda Executor
Create the RDS DB Instance
Log in to your AWS Management Console and navigate to the RDS service.
Click “Create database” to start creating a new RDS instance.
Choose the “Standard create” option, and select PostreSQL.
Select the appropriate template, availability and durability.
NOTE: At the time of this writing, the “Multi-AZ DB Cluster” option does not support setting the database name, which is a required step below.
Set the DB Instance name, the username and password.
Choose the instance configuration, and storage parameters.
In the Connectivity section, select Don’t connect to an EC2 compute resource
Select or create a VPC and subnet, and allow public access to the DB. Select or create security group and select the Availability Zone.
Open the Additional Configuration tab and set the database name to
airflow_db.Select other settings as required, and create the database by clicking Create database.
Test Connectivity
In order to be able to connect to the new RDS instance, you need to allow inbound traffic to the database from your IP address.
Under the “Security” heading in the “Connectivity & security” tab of the RDS instance, find the link to the VPC security group for your new RDS DB instance.
Create an inbound rule that allows traffic from your IP address(es) on TCP port 5432 (PostgreSQL).
Confirm that you can connect to the DB after modifying the security group. This will require having
psqlinstalled. Instructions for installingpsqlcan be found here.
NOTE: Be sure that the status of your DB is Available before testing connectivity
psql -h <endpoint> -p 5432 -U <username> <db_name>
The endpoint can be found on the “Connectivity and Security” tab, the username (and password) are the credentials used when creating the database.
The db_name should be airflow_db (unless a different one was used when creating the database.)
You will be prompted to enter the password if the connection is successful.
Creating a Lambda Function
To create them Lambda Function first start with building the docker image above (see the Dockerfile section for instructions).
Once the image is built, it needs to be put in a repository where it can be pulled by Lambda. There are multiple ways to accomplish this. This guide will use Amazon Elastic Container Registry (ECR).
Create an ECR Repository
Log in to your AWS Management Console and navigate to the ECR service.
Click Create repository.
Name the repository and fill out other information as required.
Click Create Repository.
Once the repository has been created, click on the repository. Click on the “View push commands” button on the top right.
Follow the instructions to push the Docker image, replacing image names as appropriate. Ensure the image is uploaded by refreshing the page once the image is pushed.
Create SQS Queue
You will also need two SQS queues 1) to send the results of the Airflow Task executions and 2) a Dead Letter Queue (DLQ) to handle failed invocations of the Lambda function.
Create SQS queues by following these steps (for each queue):
Log in to your AWS Management Console and navigate to the Amazon SQS Service.
Click “Create queue”.
Select “Standard” as the queue type.
Provide a name for the queue, and select the defaults that work for your use case.
Click Create.
Create Function
Finally create the function:
Log in to your AWS Management Console and navigate to the AWS Lambda Service.
Click “Create Function”.
Select “Container image” as the function type.
Provide a name for the function, select the ECR repository and image tag that you created in the previous steps, and select the execution role that you created for use in the Lambda Function.
Click Create.
Once created, add the following environment variables to the container under Configuration > Environment variables:
AIRFLOW__DATABASE__SQL_ALCHEMY_CONN, with the value being the PostgreSQL connection string in the following format using the values set during the Database section above:
postgresql+psycopg2://<username>:<password>@<endpoint>/<database_name>
AIRFLOW__LAMBDA_EXECUTOR__QUEUE_URL, with the value being the URL of the SQS queue created above.
Add other configuration as necessary for Airflow generally (see here), the Lambda executor (see here) or for remote logging (see here). Note that any configuration changes should be made across the entire Airflow environment to keep configuration consistent.
Add the dead letter queue URL to the Lambda function under Configuration > Asynchronous invocation > edit > Dead-letter queue. Select the SQS queue you created above.
If using Airflow 2 allow access to the database. There are many possible methods, but one simple approach is to add a connection to the RDS database via Configuration > RDS databases, follow the steps of the wizard.
Configure Airflow
To configure Airflow to utilize the Lambda Executor and leverage the resources we’ve set up, create a script (e.g., lambda_executor_config.sh) with at least the following contents:
export AIRFLOW__CORE__EXECUTOR='airflow.providers.amazon.aws.executors.aws_lambda.AwsLambdaExecutor'

export AIRFLOW__DATABASE__SQL_ALCHEMY_CONN=<postgres-connection-string>

export AIRFLOW__AWS_LAMBDA_EXECUTOR__FUNCTION_NAME=<lambda-function-name>

export AIRFLOW__AWS_LAMBDA_EXECUTOR__QUEUE_URL=<sqs_queue_url>

export AIRFLOW__AWS_LAMBDA_EXECUTOR__DEAD_LETTER_QUEUE_URL=<sqs_dlq_queue_url>
This script should be run on the host(s) running the Airflow Scheduler and Webserver, before those processes are started.
The script sets environment variables that configure Airflow to use the Lambda Executor and provide necessary information for task execution. Any other configuration changes made (such as for remote logging) should be added to this example script to keep configuration consistent across the Airflow environment.
Initialize the Airflow DB
The Airflow DB needs to be initialized before it can be used and a user needs to be added for you to log in. The below command adds an admin user (the command will also initialize the DB if it hasn’t been already):
airflow users create --username admin --password admin --firstname <your first name> --lastname <your last name> --email <your email> --role Admin