Dag Runs
A Dag Run is an object representing an instantiation of the Dag in time. Any time the Dag is executed, a Dag Run is created and all tasks inside it are executed. The status of the Dag Run depends on the tasks states. Each Dag Run is run separately from one another, meaning that you can have many runs of a Dag at the same time.
Dag Run Status
A Dag Run status is determined when the execution of the Dag is finished.
The execution of the Dag depends on its containing tasks and their dependencies.
The status is assigned to the Dag Run when all of the tasks are in one of the terminal states (i.e. if there is no possible transition to another state) like success, failed or skipped.
The Dag Run is having the status assigned based on the so-called “leaf nodes” or simply “leaves”. Leaf nodes are the tasks with no children.
There are two possible terminal states for the Dag Run:
successif all of the leaf nodes states are eithersuccessorskipped,failedif any of the leaf nodes state is eitherfailedorupstream_failed.
Note
Be careful if some of your tasks have defined some specific trigger rule.
These can lead to some unexpected behavior, e.g. if you have a leaf task with trigger rule “all_done”, it will be executed regardless of the states of the rest of the tasks and if it will succeed, then the whole Dag Run will also be marked as success, even if something failed in the middle.
Added in Airflow 2.7
Dags that have a currently running Dag run can be shown on the UI dashboard in the “Running” tab. Similarly, Dags whose latest Dag run is marked as failed can be found on the “Failed” tab.
Data Interval
Each Dag run in Airflow has an assigned “data interval” that represents the time range it operates in. How that interval is defined depends on the Dag’s timetable.
In Airflow 3, a Dag scheduled with a bare cron string such as @daily uses
CronTriggerTimetable by default ([scheduler] create_cron_data_intervals
is False). For that timetable, data_interval_start and
data_interval_end are the same — the trigger time (for @daily, midnight
each day). The run is created to execute at that time.
If you need a contiguous full-day window instead — for example each run covering
from midnight to the next midnight — use a data-interval timetable such as
CronDataIntervalTimetable, or set [scheduler] create_cron_data_intervals
to True. With that setup, a Dag run is usually scheduled after its
associated data interval has ended, so a run covering 2020-01-01 generally does
not start until after 2020-01-02 00:00:00.
See timetables comparison for a
side-by-side comparison, including how logical_date and run_id differ.
All dates in Airflow are tied to the data interval concept in some way. The
“logical date” (also called execution_date in Airflow versions prior to 2.2)
of a Dag run is defined by the timetable: for both timetable kinds it is
data_interval_start. For the default (zero-width) trigger timetable that
equals the trigger time. With a non-zero interval= on a trigger timetable
it is trigger_time - interval. For a data-interval timetable it is the
start of the contiguous window, not when the Dag is actually executed.
Similarly, the start_date argument for the Dag and its tasks marks the
earliest trigger time (run_after) the scheduler will create, not when
tasks start running, and not necessarily the first logical date (see the
non-zero interval= case above). A run is only created once the timetable
reaches that bound. For a data-interval timetable, start_date is also the
start of the first data interval, so that first run does not execute until the
window closes, one schedule period after start_date.
Tip
If a cron expression or timedelta object is not enough to express your Dag’s schedule,
logical date, or data interval, see Timetables.
For more information on logical date, see Running Dags and
What does execution_date mean?
Manual Triggering and Data Intervals
When you manually trigger a Dag (for example from the UI, CLI, REST API, or
TriggerDagRunOperator), do not assume the run’s data_interval is
derived from, or equal to, the supplied logical_date.
For scheduled runs, the timetable defines the data interval directly. For
manually triggered runs, the resulting data_interval depends on the
timetable and the trigger path, and may differ from the run’s
logical_date.
If your Dag logic needs the user-specified date for a manual run, use
logical_date explicitly instead of assuming it matches
data_interval_start or data_interval_end.
For upgrade guidance, see Manual Dag Runs and logical_date.
Re-run Dag
There can be cases where you will want to execute your Dag again. One such case is when the scheduled Dag run fails.
Catchup
An Airflow Dag defined with a start_date, possibly an end_date, and a non-asset schedule, defines a series of scheduled run times which the scheduler turns into individual Dag runs and executes.
By default, missed scheduled run times between start_date and “now” are not backfilled when a Dag is activated (Airflow config scheduler.catchup_by_default=False). The timetable instead selects the most recently applicable scheduled run time (for a trigger timetable, typically the latest cron tick that is not after “now” and not before start_date).
If you set catchup=True in the Dag, the scheduler will kick off a Dag Run for any scheduled run time that has not been run since the last run (or has been cleared). This concept is called Catchup.
If your Dag is not written to handle its catchup (i.e., not limited to the interval, but instead to Now for instance.),
then you will want to turn catchup off, which is the default setting or can be done explicitly by setting catchup=False in the Dag definition, if the default config has been changed for your Airflow environment.
"""
Code that goes along with the Airflow tutorial located at:
https://github.com/apache/airflow/blob/main/airflow/example_dags/tutorial.py
"""

from airflow.sdk import DAG
from airflow.providers.standard.operators.bash import BashOperator

import datetime
import pendulum

dag = DAG(
    "tutorial",
    default_args={
        "depends_on_past": True,
        "retries": 1,
        "retry_delay": datetime.timedelta(minutes=3),
    },
    start_date=pendulum.datetime(2015, 12, 1, tz="UTC"),
    description="A simple tutorial Dag",
    schedule="@daily",
)
In the example above, if the Dag is picked up by the scheduler daemon on
2016-01-02 at 6 AM (or from the command line), with the Airflow 3 default of
CronTriggerTimetable for @daily and catchup=False, the scheduler
does not create runs for every midnight since start_date. Instead it
creates a single Dag run for the most recent applicable tick — midnight on
2016-01-02 — with data_interval_start and data_interval_end both
equal to that trigger time. Because that run_after is already in the past,
the run can start immediately. The following tick (midnight on 2016-01-03) is
only created once that schedule time is reached.
If instead the Dag used a data-interval timetable (for example
CronDataIntervalTimetable, or [scheduler] create_cron_data_intervals=True),
the scheduler would immediately create a run for the most recently completed
interval (2016-01-01 through 2016-01-02), and the next run would cover
2016-01-02 through 2016-01-03 after that interval ends.
Be aware that using a datetime.timedelta object as schedule is not the
same as a cron string, even though Airflow 3 also defaults timedelta schedules
to a trigger timetable (DeltaTriggerTimetable, via
[scheduler] create_delta_data_intervals). A delta has no wall-clock boundary
to snap to, so with catchup=False the first run lands at pickup time
(2016-01-02 06:00 in this example), with data_interval_start and
data_interval_end both equal to that moment. If instead you enable the data-interval delta
timetable (create_delta_data_intervals=True), the first run covers one
schedule interval ending now (2016-01-01 06:00 through 2016-01-02 06:00). For a
more detailed description of the differences, see
timetables comparison and
cron vs delta data intervals.
If the dag.catchup value had been True instead, the scheduler would have
created a Dag Run for each scheduled run time between start_date and “now”
that had not yet run (or had been cleared).
With the default trigger timetable that means every midnight from 2015-12-01
through 2016-01-02 inclusive. With a data-interval timetable, the still-open
interval that ends at the next midnight is not created yet.
Catchup is also triggered when you turn off a Dag for a specified period and then re-enable it.
This behavior is great for atomic assets that can easily be split into periods. Leaving catchup off is great if your Dag performs catchup internally.
Backfill
You may want to run the Dag for a specified historical period. For example,
a Dag is created with start_date 2024-11-21, but another user requires
the output data from a month prior, i.e. 2024-10-21.
This process is known as Backfill.
This can be done through either the UI or CLI.
UI
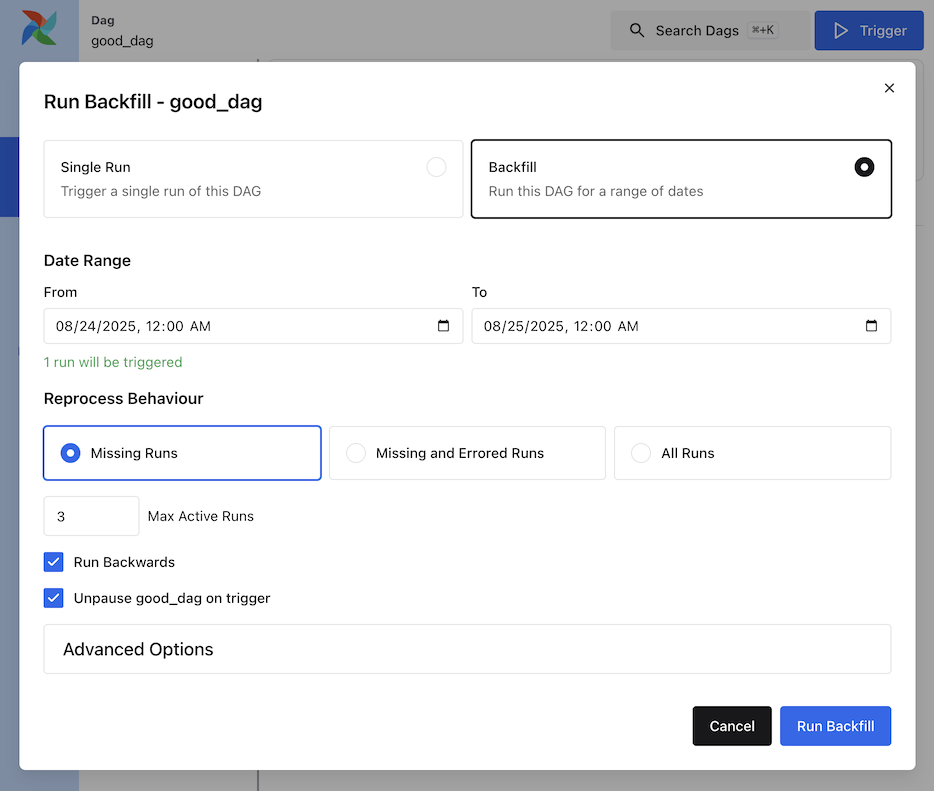
From the Dag Details page, click Trigger and select Backfill to open the backfill form. Set the date range, reprocess behavior, max active runs, optional backwards ordering, and Advanced Config.
CLI
For CLI usage, run the command below:
airflow backfill create --dag-id DAG_ID \
    --from-date START_DATE \
    --to-date END_DATE \
    --reprocess-behavior failed \
    --max-active-runs 3 \
    --run-backwards \
    --dag-run-conf '{"my": "param"}'
The backfill command will re-run all the instances of the dag_id for all the intervals within the start date and end date.
Re-run Tasks
Some of the tasks can fail during the scheduled run. Once you have fixed
the errors after going through the logs, you can re-run the tasks by clearing them for the
scheduled date. Clearing a task instance creates a record of the task instance.
The try_number of the current task instance is incremented, the max_tries set to 0 and the state set to None, which causes the task to re-run.
An experimental feature in Airflow 3.1.0 allows you to clear the task instances and re-run with the latest bundle version.
Click on the failed task in the Tree or Graph views and then click on Clear. The executor will re-run it.
There are multiple options you can select to re-run -
Past - All the instances of the task in the runs before the Dag’s most recent data interval
Future - All the instances of the task in the runs after the Dag’s most recent data interval
Upstream - The upstream tasks in the current Dag
Downstream - The downstream tasks in the current Dag
Recursive - All the tasks in the child Dags and parent Dags
Failed - Only the failed tasks in the Dag’s most recent run
Keep task state and resume - Preserve the task’s
task_state_storeentries instead of discarding them, so the next attempt resumes from a checkpoint or reconnects to an external job instead of starting over. See Resumable Tasks for details.
Clearing an individual task instance discards its task state store entries by default, so the next attempt starts from the beginning instead of resuming a checkpoint or reconnecting to an external job. See Resumable Tasks for when to keep it instead.
You can also clear the task through CLI using airflowctl tasks clear, which discards task state
the same way and accepts --keep-task-state to opt back in. The legacy, deprecated
airflow tasks clear command below always keeps task state:
airflow tasks clear dag_id \
    --task-regex task_regex \
    --start-date START_DATE \
    --end-date END_DATE
For the specified dag_id and time interval, the command clears all instances of the tasks matching the regex.
For more options, you can check the help of the clear command :
airflow tasks clear --help
Task Instance History
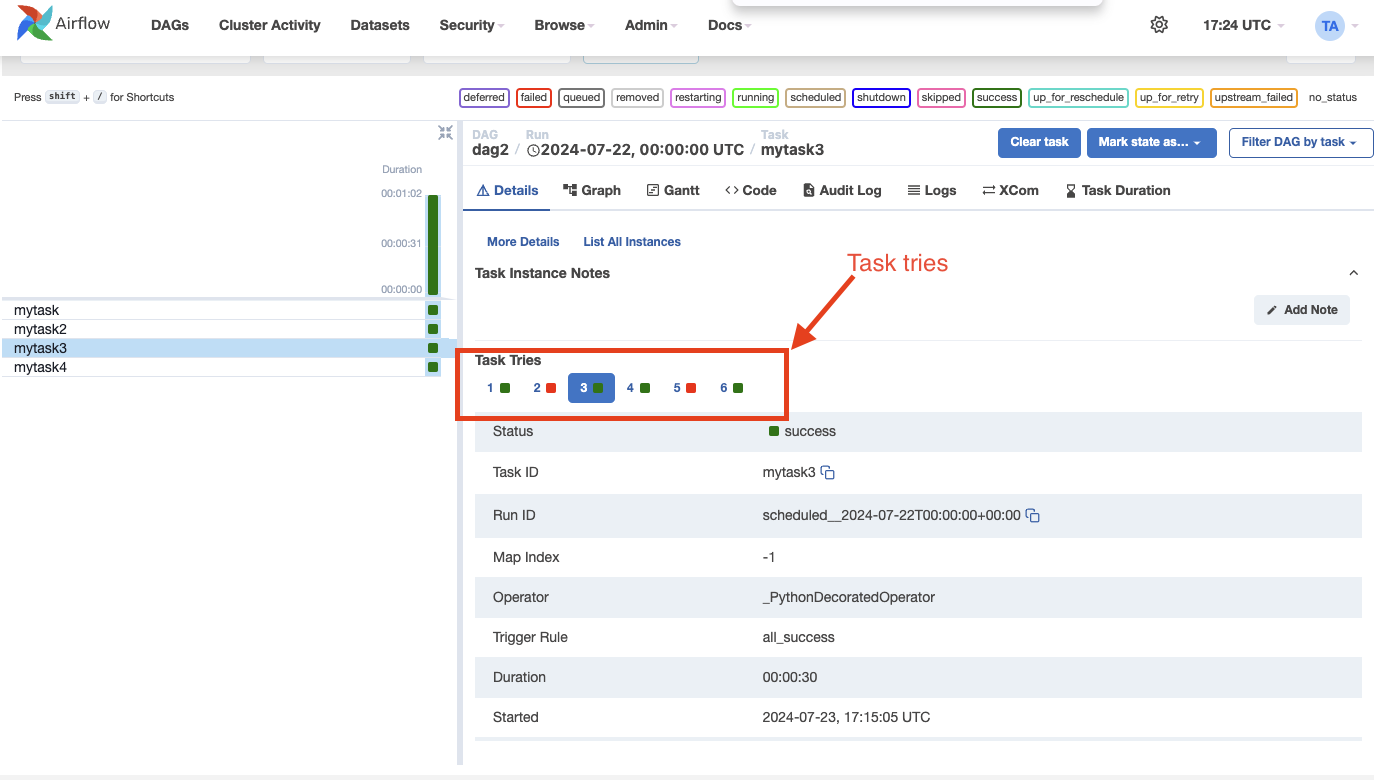
When a task instance retries or is cleared, the task instance history is preserved. You can see this history by clicking on the task instance in the Grid view.
Note
The try selector shown above is only available for tasks that have been retried or cleared.
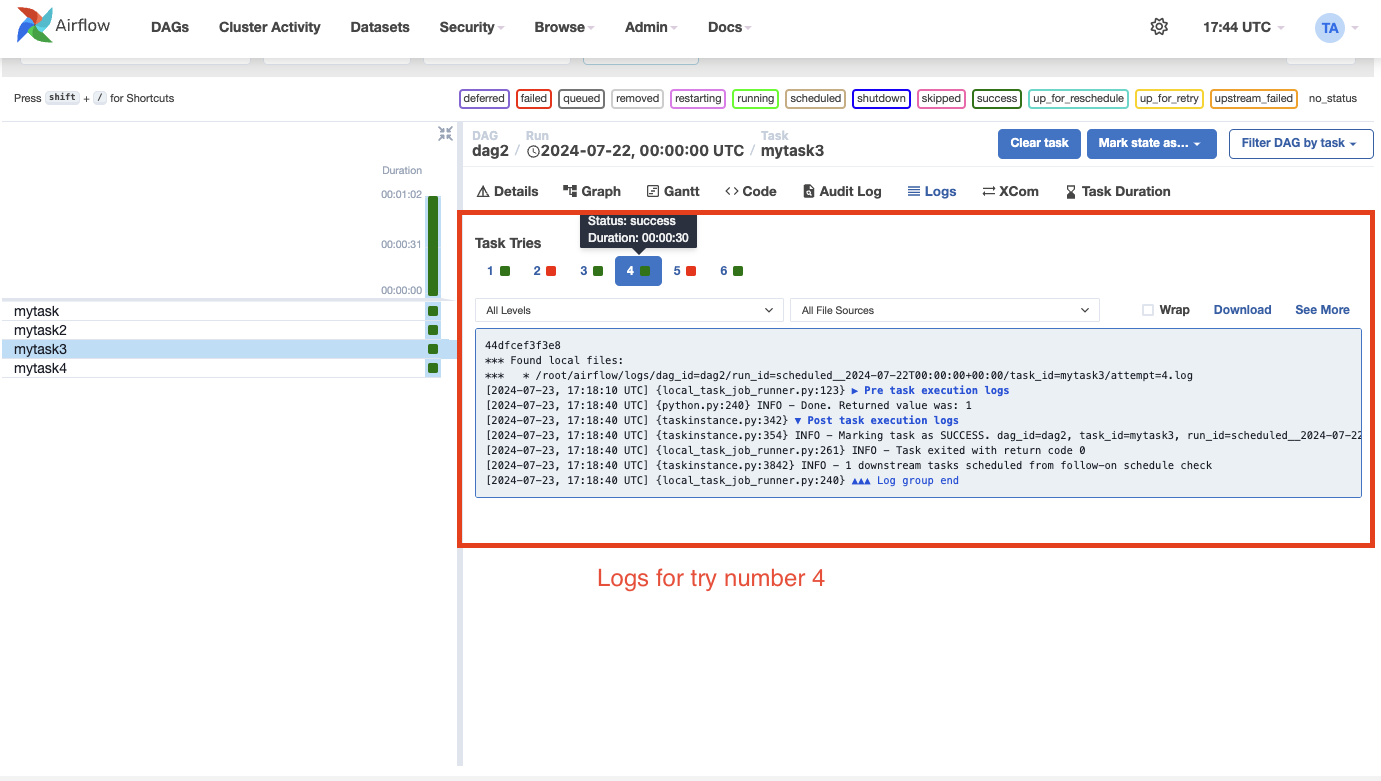
The history shows the value of the task instance attributes at the end of the particular run. On the log page, you can also see the logs for each of the task instance tries. This can be useful for debugging.
Note
Related task instance objects like the XComs, rendered template fields, etc., are not preserved in the history. Only the task instance attributes, including the logs, are preserved.
External Triggers
Note that Dag Runs can also be created manually through the CLI. Just run the command -
airflow dags trigger --logical-date logical_date run_id
The Dag Runs created externally to the scheduler get associated with the trigger’s timestamp and are displayed
in the UI alongside scheduled Dag runs. The logical date passed inside the Dag can be specified using the -e argument.
The default is the current date in the UTC timezone.
In addition, you can also manually trigger a Dag Run using the web UI (tab Dags -> column Links -> button Trigger Dag)
Passing Parameters when triggering Dags
When triggering a Dag from the CLI, the REST API or the UI, it is possible to pass configuration for a Dag Run as a JSON blob.
Example of a parameterized Dag:
import pendulum

from airflow.sdk import DAG
from airflow.providers.standard.operators.bash import BashOperator

dag = DAG(
    "example_parameterized_dag",
    schedule=None,
    start_date=pendulum.datetime(2021, 1, 1, tz="UTC"),
    catchup=False,
)

parameterized_task = BashOperator(
    task_id="parameterized_task",
    bash_command="echo \"here is the message: '$message'\"",
    env={"message": '{{ dag_run.conf["message"] if dag_run else "" }}'},
    dag=dag,
)
Note: The parameters from dag_run.conf can only be used in a template field of an operator.
Wait for a Dag Run
Airflow provides an experimental API to wait for a Dag run to complete. This is particularly useful when integrating Airflow into external systems or automation pipelines that need to pause execution until a Dag finishes.
The endpoint blocks (by polling) until the specified Dag run reaches a terminal state: success, failed, or canceled.
This endpoint streams responses using the NDJSON (Newline-Delimited JSON) format. Each line in the response is a JSON object representing the state of the Dag run at that moment.
For example:
{"state": "running"}
{"state": "success", "results": {"op": 42}}
This allows clients to monitor the run in real time and optionally collect XCom results from specific tasks.
Note
This feature is experimental and may change or be removed in future Airflow versions.
Using CLI
airflow dags trigger --conf '{"conf1": "value1"}' example_parameterized_dag
To Keep in Mind
Marking task instances as failed can be done through the UI. This can be used to stop running task instances.
Marking task instances as successful can be done through the UI. This is mostly to fix false negatives, or for instance, when the fix has been applied outside of Airflow.