Building a Simple Data Pipeline
Welcome to the third tutorial in our series! At this point, you’ve already written your first Dag and used some basic operators. Now it’s time to build a small but meaningful data pipeline – one that retrieves data from an external source, loads it into a database, and cleans it up along the way.
This tutorial introduces the SQLExecuteQueryOperator, a flexible and modern way to execute SQL in Airflow. We’ll use
it to interact with a local Postgres database, which we’ll configure in the Airflow UI.
By the end of this tutorial, you’ll have a working pipeline that:
Downloads a CSV file
Loads the data into a staging table
Cleans the data and upserts it into a target table
Along the way, you’ll gain hands-on experience with Airflow’s UI, connection system, SQL execution, and Dag authoring patterns.
Want to go deeper as you go? Here are two helpful references:
The SQLExecuteQueryOperator documentation
The Postgres provider documentation
Let’s get started!
Initial setup
Caution
You’ll need Docker installed to run this tutorial. We’ll be using Docker Compose to launch Airflow locally. If you need help setting it up, check out the Docker Compose quickstart guide.
To run our pipeline, we need a working Airflow environment. Docker Compose makes this easy and safe – no system-wide installs required. Just open your terminal and run the following:
# Download the docker-compose.yaml file
curl -LfO 'https://airflow.apache.org/docs/apache-airflow/stable/docker-compose.yaml'

# Make expected directories and set an expected environment variable
mkdir -p ./dags ./logs ./plugins
echo -e "AIRFLOW_UID=$(id -u)" > .env

# Initialize the database
docker compose up airflow-init

# Start up all services
docker compose up
Once Airflow is up and running, visit the UI at http://localhost:8080.
Log in with:
Username:
airflowPassword:
airflow
You’ll land in the Airflow dashboard, where you can trigger Dags, explore logs, and manage your environment.
Create a Postgres Connection
Before our pipeline can write to Postgres, we need to tell Airflow how to connect to it. In the UI, open the Admin > Connections page and click the + button to add a new connection.
Fill in the following details:
Connection ID:
tutorial_pg_connConnection Type:
postgresHost:
postgresDatabase:
airflow(this is the default database in our container)Login:
airflowPassword:
airflowPort:
5432
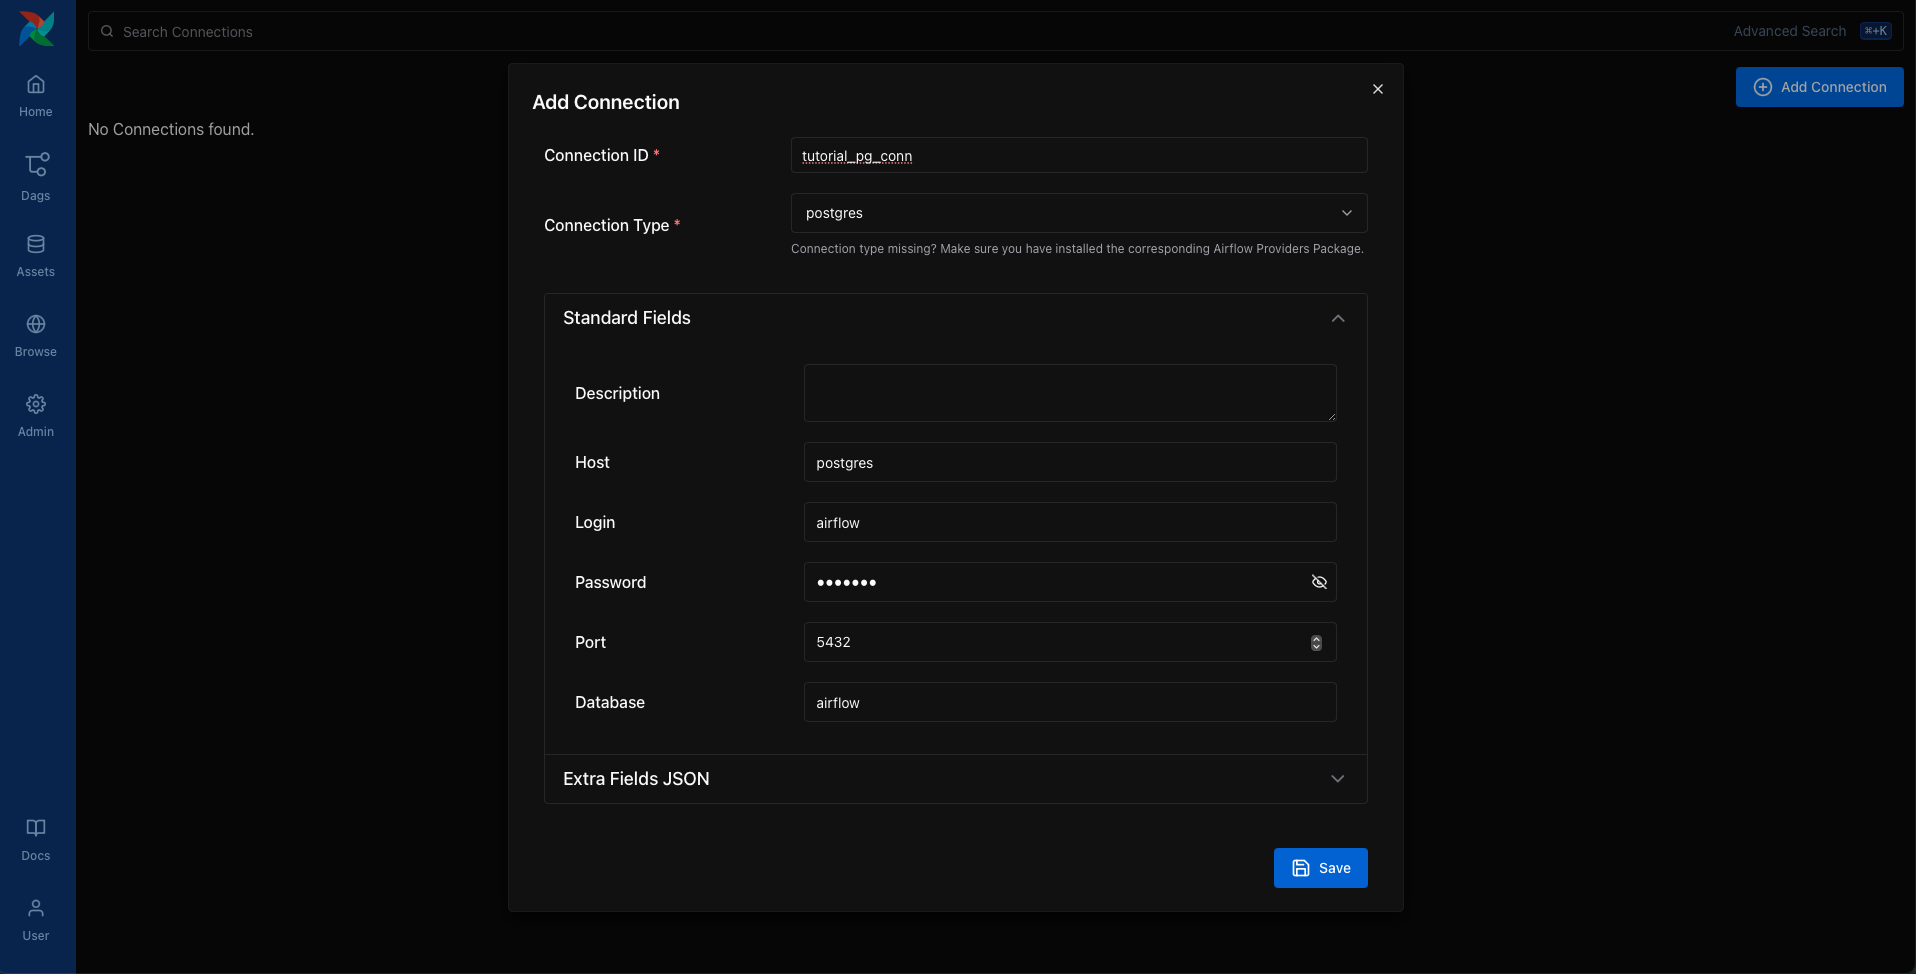
Save the connection. This tells Airflow how to reach the Postgres database running in your Docker environment.
Next, we’ll start building the pipeline that uses this connection.
Create tables for staging and final data
Let’s begin with table creation. We’ll create two tables:
employees_temp: a staging table used for raw dataemployees: the cleaned and deduplicated destination
We’ll use the SQLExecuteQueryOperator to run the SQL statements needed to create these tables.
from airflow.providers.common.sql.operators.sql import SQLExecuteQueryOperator

create_employees_table = SQLExecuteQueryOperator(
    task_id="create_employees_table",
    conn_id="tutorial_pg_conn",
    sql="""
        CREATE TABLE IF NOT EXISTS employees (
            "Serial Number" NUMERIC PRIMARY KEY,
            "Company Name" TEXT,
            "Employee Markme" TEXT,
            "Description" TEXT,
            "Leave" INTEGER
        );""",
)

create_employees_temp_table = SQLExecuteQueryOperator(
    task_id="create_employees_temp_table",
    conn_id="tutorial_pg_conn",
    sql="""
        DROP TABLE IF EXISTS employees_temp;
        CREATE TABLE employees_temp (
            "Serial Number" NUMERIC PRIMARY KEY,
            "Company Name" TEXT,
            "Employee Markme" TEXT,
            "Description" TEXT,
            "Leave" INTEGER
        );""",
)
You can optionally place these SQL statements in .sql files inside your dags/ folder and pass the file path to
the sql= argument. This can be a great way to keep your Dag code clean.
Load data into the staging table
Next, we’ll download a CSV file, save it locally, and load it into employees_temp using the PostgresHook.
import os
import requests
from airflow.sdk import task
from airflow.providers.postgres.hooks.postgres import PostgresHook


@task
def get_data():
    # NOTE: configure this as appropriate for your Airflow environment
    data_path = "/opt/airflow/dags/files/employees.csv"
    os.makedirs(os.path.dirname(data_path), exist_ok=True)

    url = "https://raw.githubusercontent.com/apache/airflow/main/airflow-core/docs/tutorial/pipeline_example.csv"

    response = requests.request("GET", url)

    with open(data_path, "w") as file:
        file.write(response.text)

    postgres_hook = PostgresHook(postgres_conn_id="tutorial_pg_conn")
    conn = postgres_hook.get_conn()
    cur = conn.cursor()
    with open(data_path, "r") as file:
        cur.copy_expert(
            "COPY employees_temp FROM STDIN WITH CSV HEADER DELIMITER AS ',' QUOTE '\"'",
            file,
        )
    conn.commit()
This task gives you a taste of combining Airflow with native Python and SQL hooks – a common pattern in real-world pipelines.
Merge and clean the data
Now let’s deduplicate the data and merge it into our final table. We’ll write a task that runs a SQL INSERT … ON CONFLICT DO UPDATE.
from airflow.sdk import task
from airflow.providers.postgres.hooks.postgres import PostgresHook


@task
def merge_data():
    query = """
        INSERT INTO employees
        SELECT *
        FROM (
            SELECT DISTINCT *
            FROM employees_temp
        ) t
        ON CONFLICT ("Serial Number") DO UPDATE
        SET
              "Employee Markme" = excluded."Employee Markme",
              "Description" = excluded."Description",
              "Leave" = excluded."Leave";
    """
    try:
        postgres_hook = PostgresHook(postgres_conn_id="tutorial_pg_conn")
        conn = postgres_hook.get_conn()
        cur = conn.cursor()
        cur.execute(query)
        conn.commit()
        return 0
    except Exception as e:
        return 1
Defining the Dag
Now that we’ve defined all our tasks, it’s time to put them together into a Dag.
import datetime
import pendulum
import os

import requests
from airflow.sdk import dag, task
from airflow.providers.postgres.hooks.postgres import PostgresHook
from airflow.providers.common.sql.operators.sql import SQLExecuteQueryOperator


@dag(
    dag_id="process_employees",
    schedule="0 0 * * *",
    start_date=pendulum.datetime(2021, 1, 1, tz="UTC"),
    catchup=False,
    dagrun_timeout=datetime.timedelta(minutes=60),
)
def ProcessEmployees():
    create_employees_table = SQLExecuteQueryOperator(
        task_id="create_employees_table",
        conn_id="tutorial_pg_conn",
        sql="""
            CREATE TABLE IF NOT EXISTS employees (
                "Serial Number" NUMERIC PRIMARY KEY,
                "Company Name" TEXT,
                "Employee Markme" TEXT,
                "Description" TEXT,
                "Leave" INTEGER
            );""",
    )

    create_employees_temp_table = SQLExecuteQueryOperator(
        task_id="create_employees_temp_table",
        conn_id="tutorial_pg_conn",
        sql="""
            DROP TABLE IF EXISTS employees_temp;
            CREATE TABLE employees_temp (
                "Serial Number" NUMERIC PRIMARY KEY,
                "Company Name" TEXT,
                "Employee Markme" TEXT,
                "Description" TEXT,
                "Leave" INTEGER
            );""",
    )

    @task
    def get_data():
        # NOTE: configure this as appropriate for your Airflow environment
        data_path = "/opt/airflow/dags/files/employees.csv"
        os.makedirs(os.path.dirname(data_path), exist_ok=True)

        url = "https://raw.githubusercontent.com/apache/airflow/main/airflow-core/docs/tutorial/pipeline_example.csv"

        response = requests.request("GET", url)

        with open(data_path, "w") as file:
            file.write(response.text)

        postgres_hook = PostgresHook(postgres_conn_id="tutorial_pg_conn")
        conn = postgres_hook.get_conn()
        cur = conn.cursor()
        with open(data_path, "r") as file:
            cur.copy_expert(
                "COPY employees_temp FROM STDIN WITH CSV HEADER DELIMITER AS ',' QUOTE '\"'",
                file,
            )
        conn.commit()

    @task
    def merge_data():
        query = """
            INSERT INTO employees
            SELECT *
            FROM (
                SELECT DISTINCT *
                FROM employees_temp
            ) t
            ON CONFLICT ("Serial Number") DO UPDATE
            SET
              "Employee Markme" = excluded."Employee Markme",
              "Description" = excluded."Description",
              "Leave" = excluded."Leave";
        """
        try:
            postgres_hook = PostgresHook(postgres_conn_id="tutorial_pg_conn")
            conn = postgres_hook.get_conn()
            cur = conn.cursor()
            cur.execute(query)
            conn.commit()
            return 0
        except Exception as e:
            return 1

    [create_employees_table, create_employees_temp_table] >> get_data() >> merge_data()


dag = ProcessEmployees()
Save this Dag as dags/process_employees.py. After a short delay, it will show up in the UI.
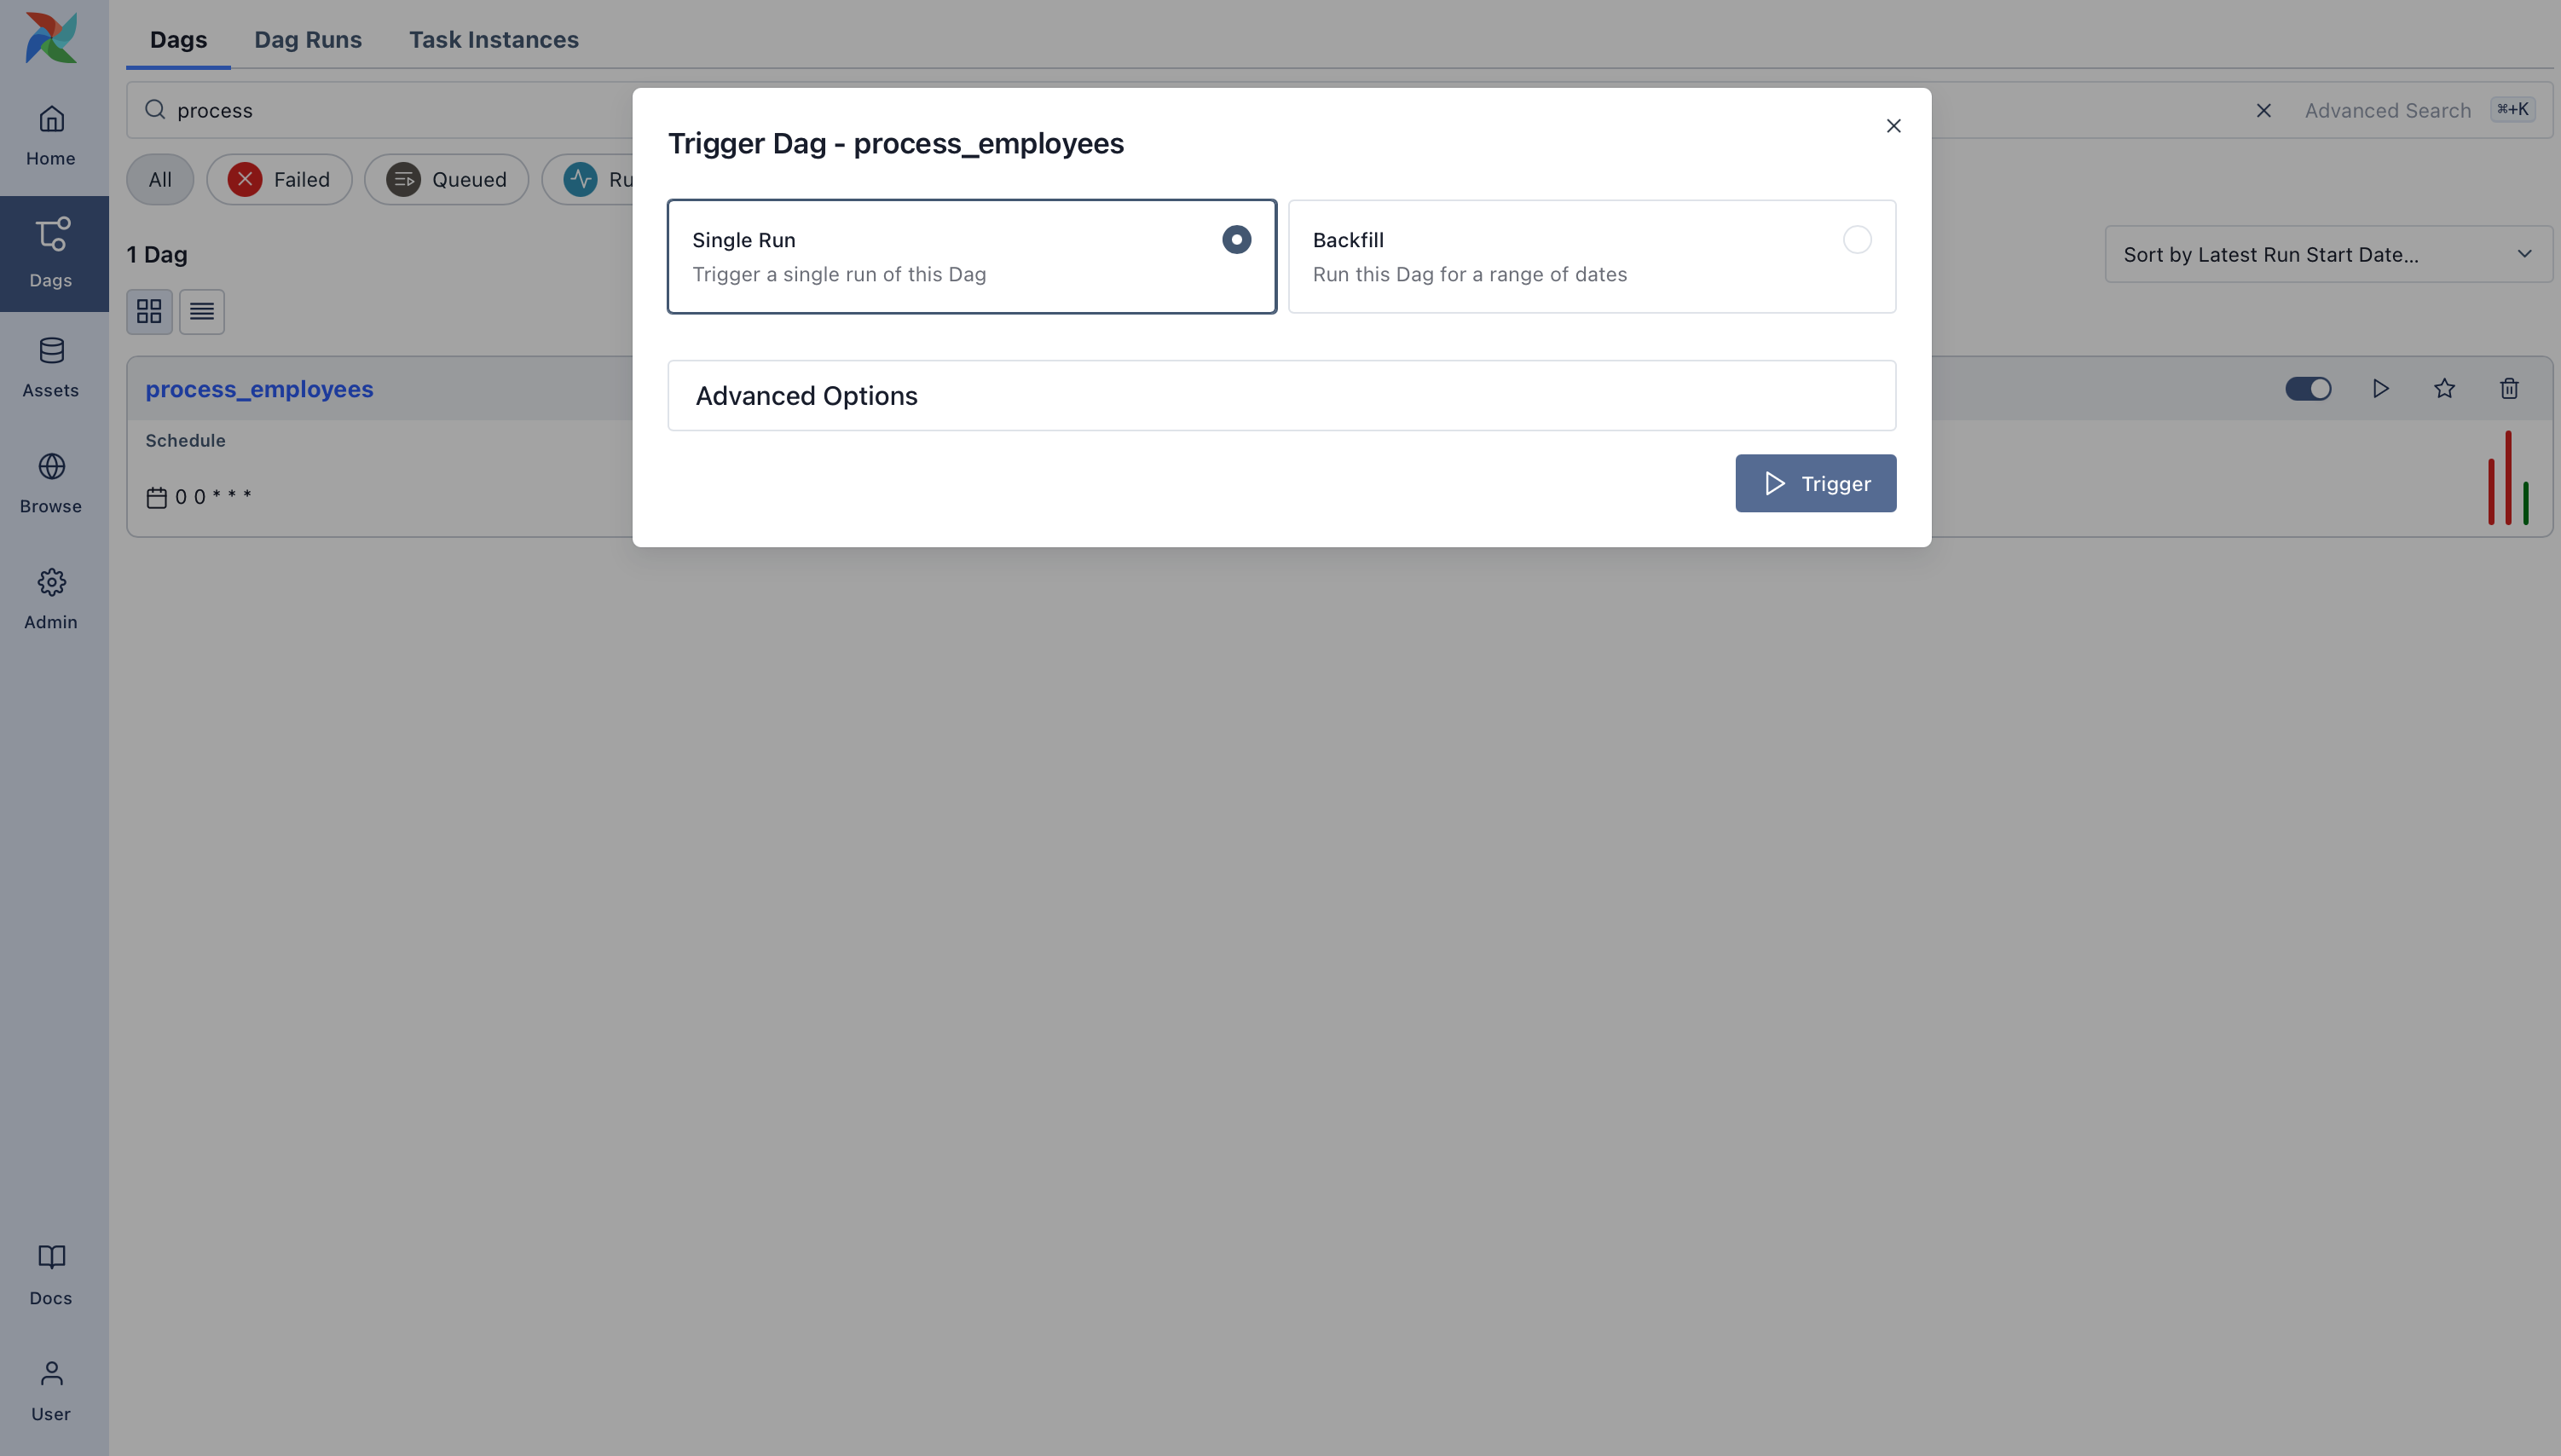
Trigger and explore your Dag
Open the Airflow UI and find the process_employees Dag in the list. Toggle it “on” using the slider, then trigger a
run using the play button.
You can watch each task as it runs in the Grid view, and explore logs for each step.
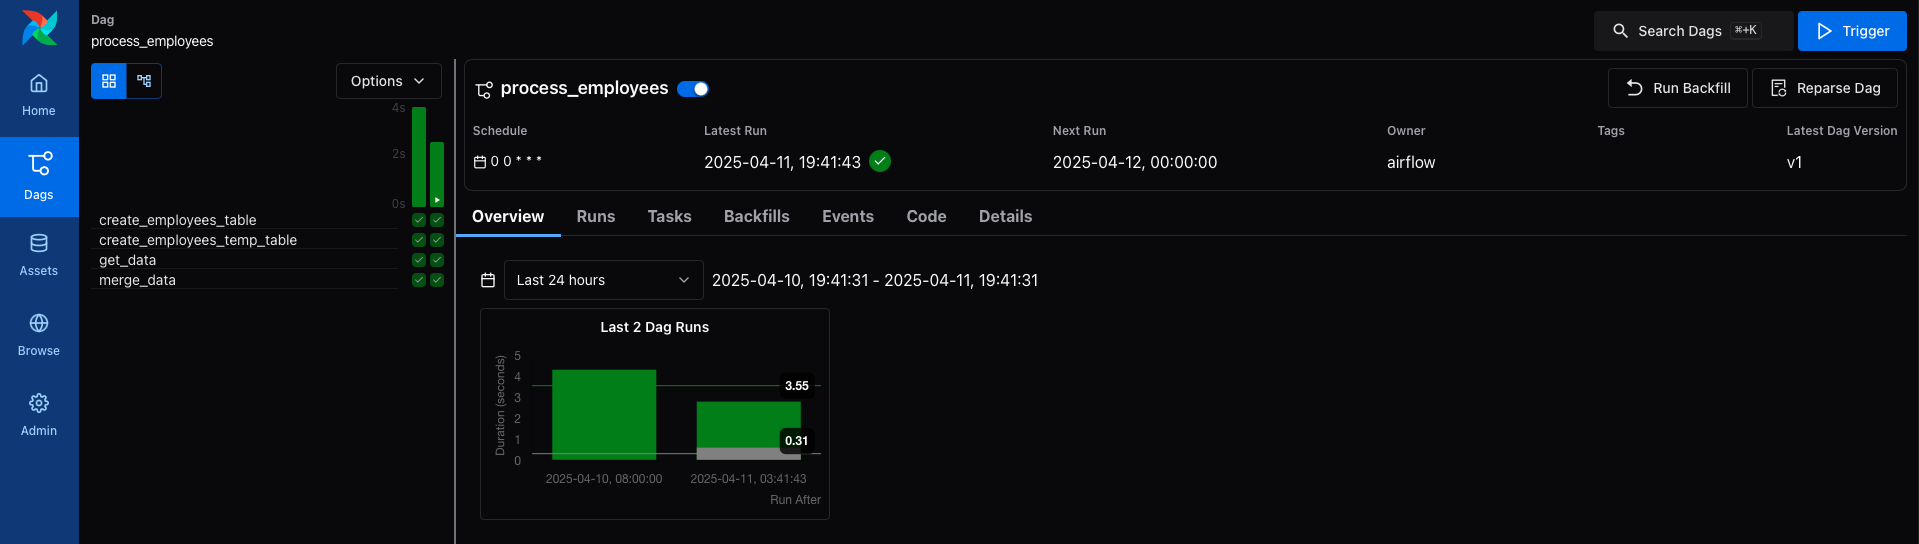
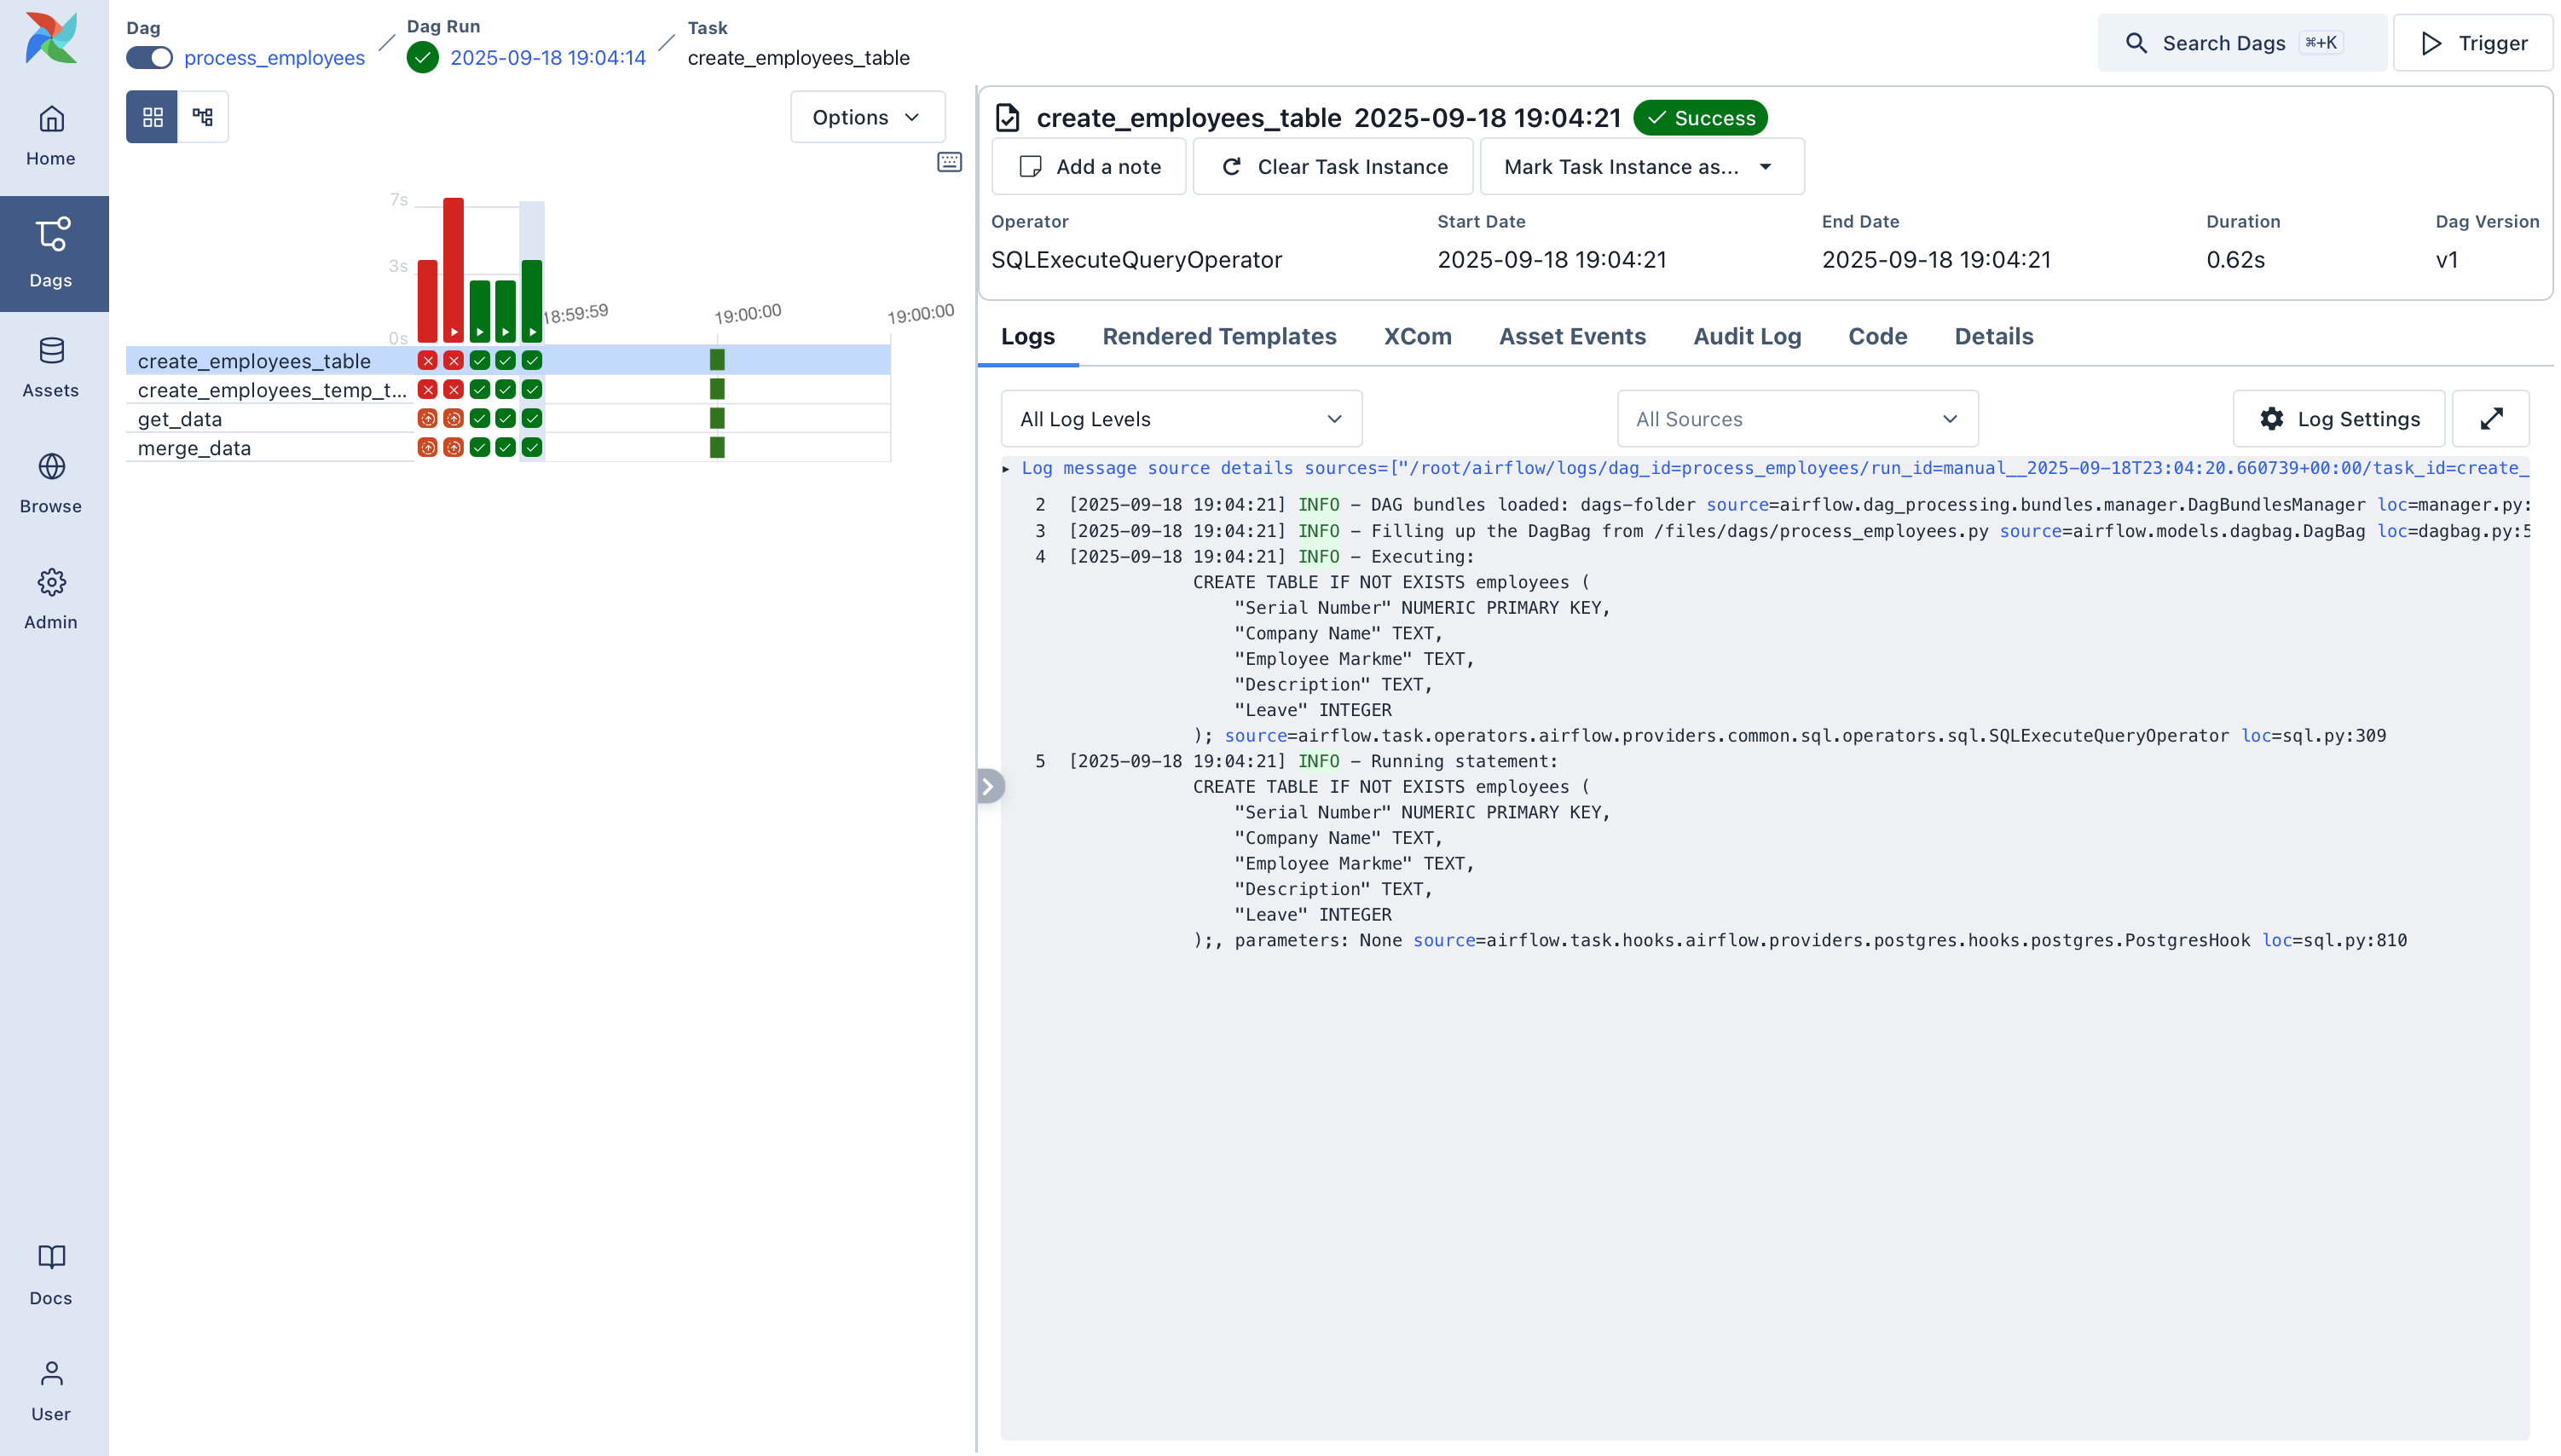
Once it succeeds, you’ll have a fully working pipeline that integrates data from the outside world, loads it into Postgres, and keeps it clean.
What’s Next?
Nice work! You’ve now built a real pipeline using Airflow’s core patterns and tools. Here are a few ideas for where to go next:
Try swapping in a different SQL provider, like MySQL or SQLite.
Split your Dag into TaskGroups or refactor into a more usable pattern.
Add an alerting step or send a notification when data is processed.
See also
Browse more how-to guides in the Airflow documentation
Explore the SQL provider reference
Learn how to write your own custom operator